
Bought in 2013 by Google, Waze has become one of the most widely used free GPS applications in the world in just a few years. Its success is undoubtedly due to the many features offered by the application, but also to its mapping that is always (or almost always) up to date, thanks to information reported by other users: construction zones, accidents, objects on the road, localized weather phenomena, traffic jams, all the events taking place on a defined route allow drivers to anticipate problems, and sometimes even opt for an alternative route.
But Waze also owes its incredible popularity to its community of volunteers who work daily to improve and update the map information.
Over the years, and through the application's numerous updates, Waze has introduced a multitude of new features and implemented options to meet user needs. Often overlooked, these little tricks and hidden features allow, when perfectly mastered, to take full advantage of the application. Here's a quick overview of everything you need to know to master Waze on Android and iOS.
1. Ask for help if you have a problem
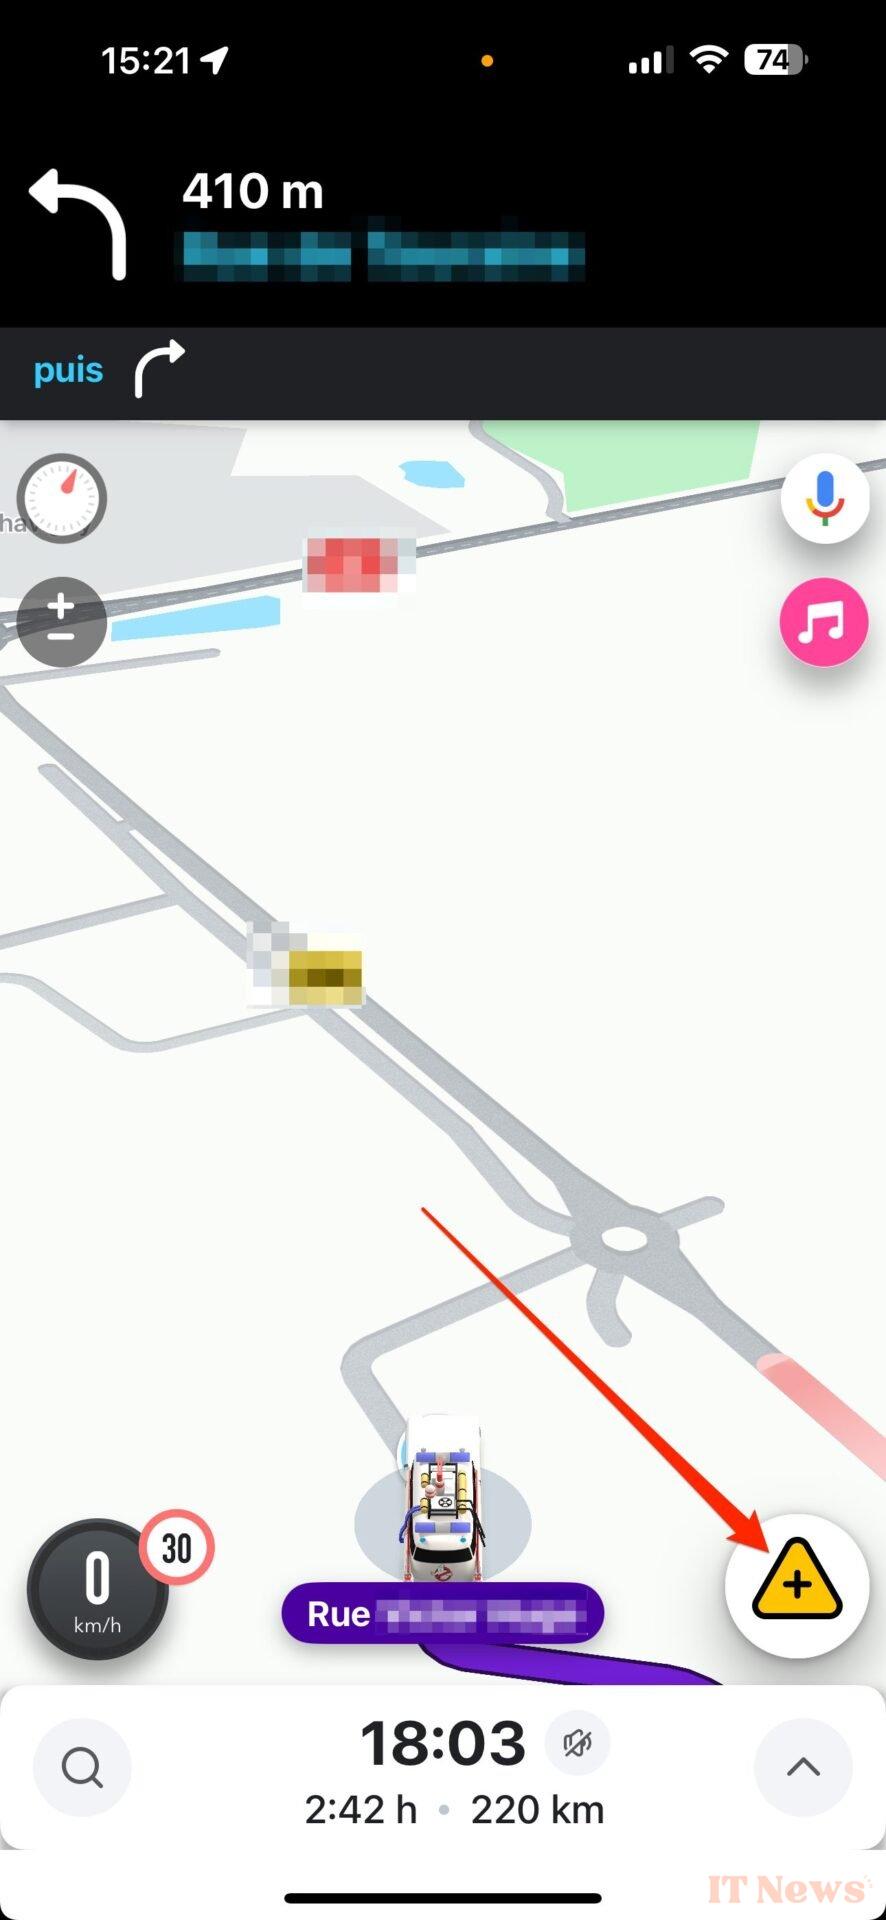
You may not know it, but if you run into a problem during a trip, you can ask for help directly from Waze. To do this, press the report button represented by a yellow triangle, then select Roadside Assistance.
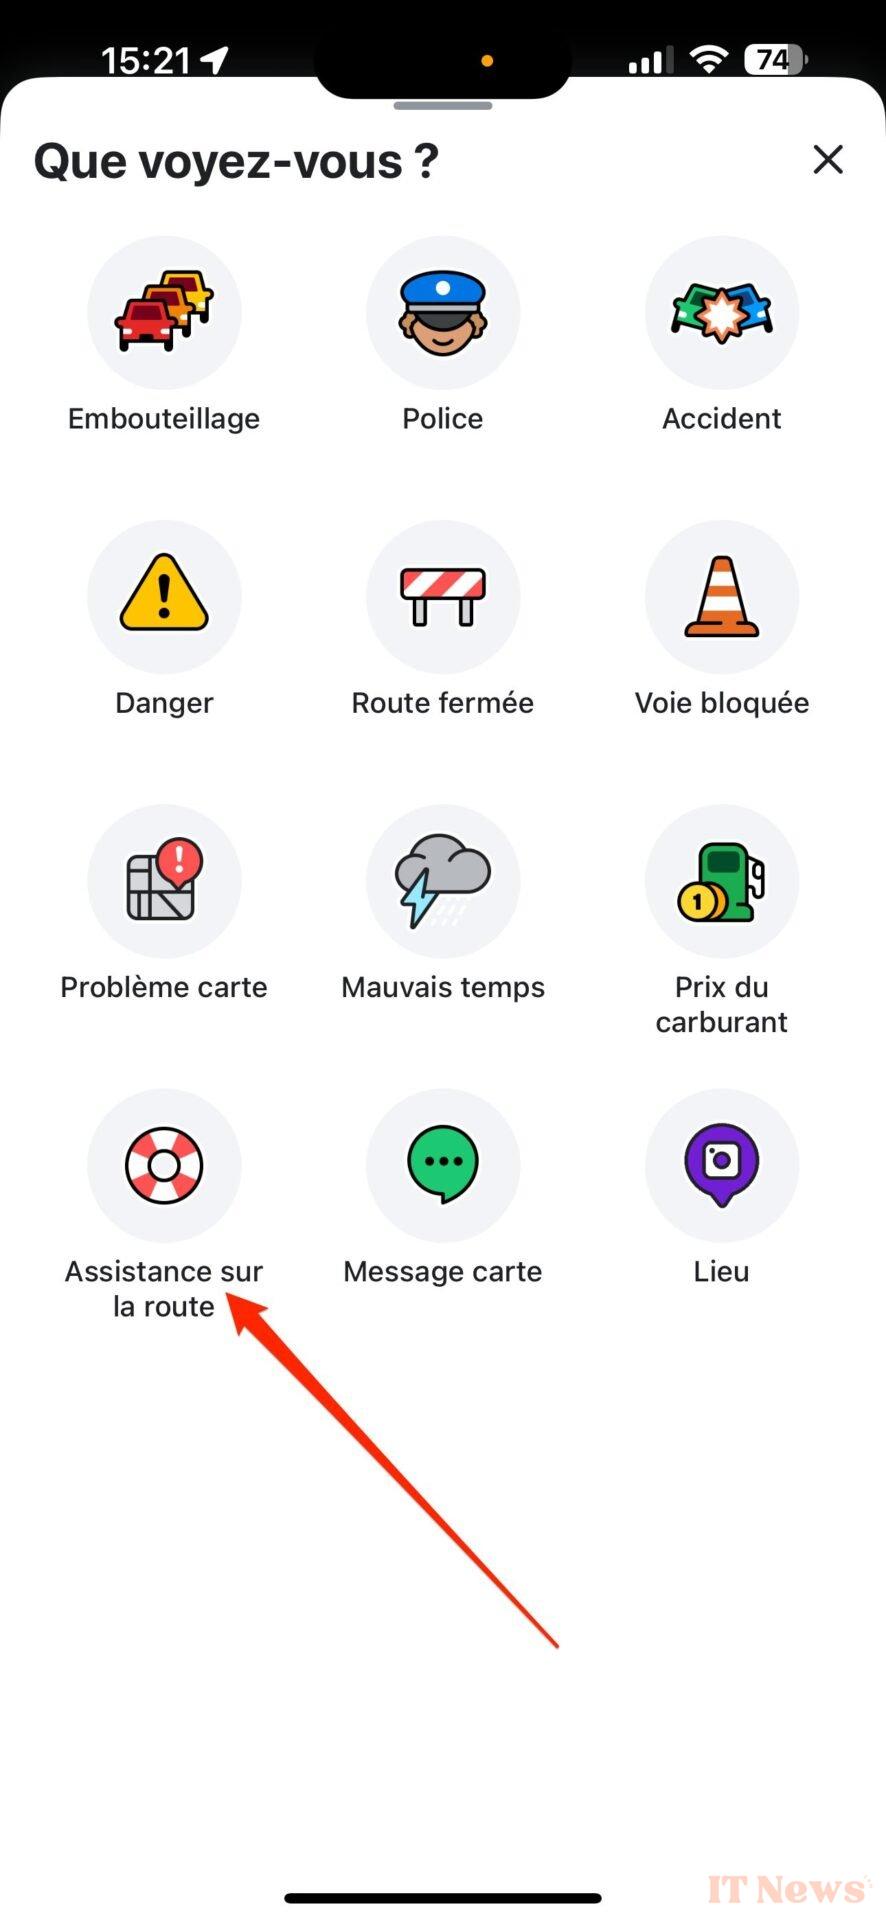
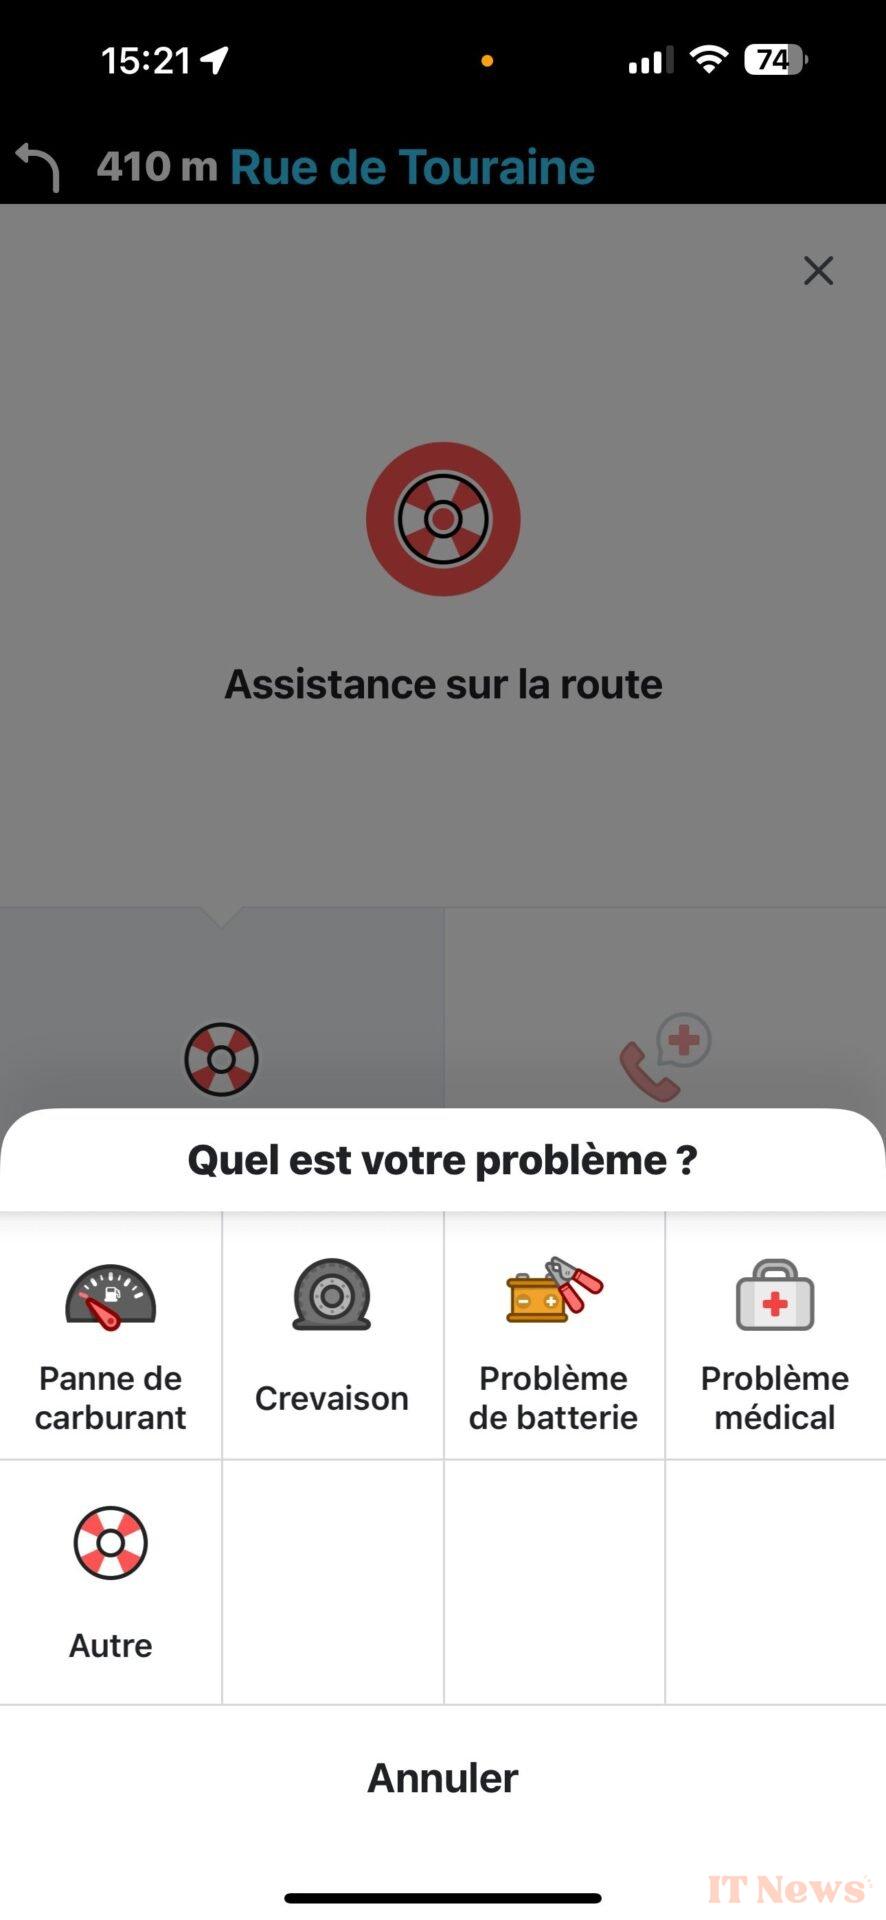
Then select Other Wazers, then in the pop-up that appears at the bottom of the screen, select your problem. Then press the Submit button. Other Wazers near you will then see your request for help displayed on the map and will be able to help you.


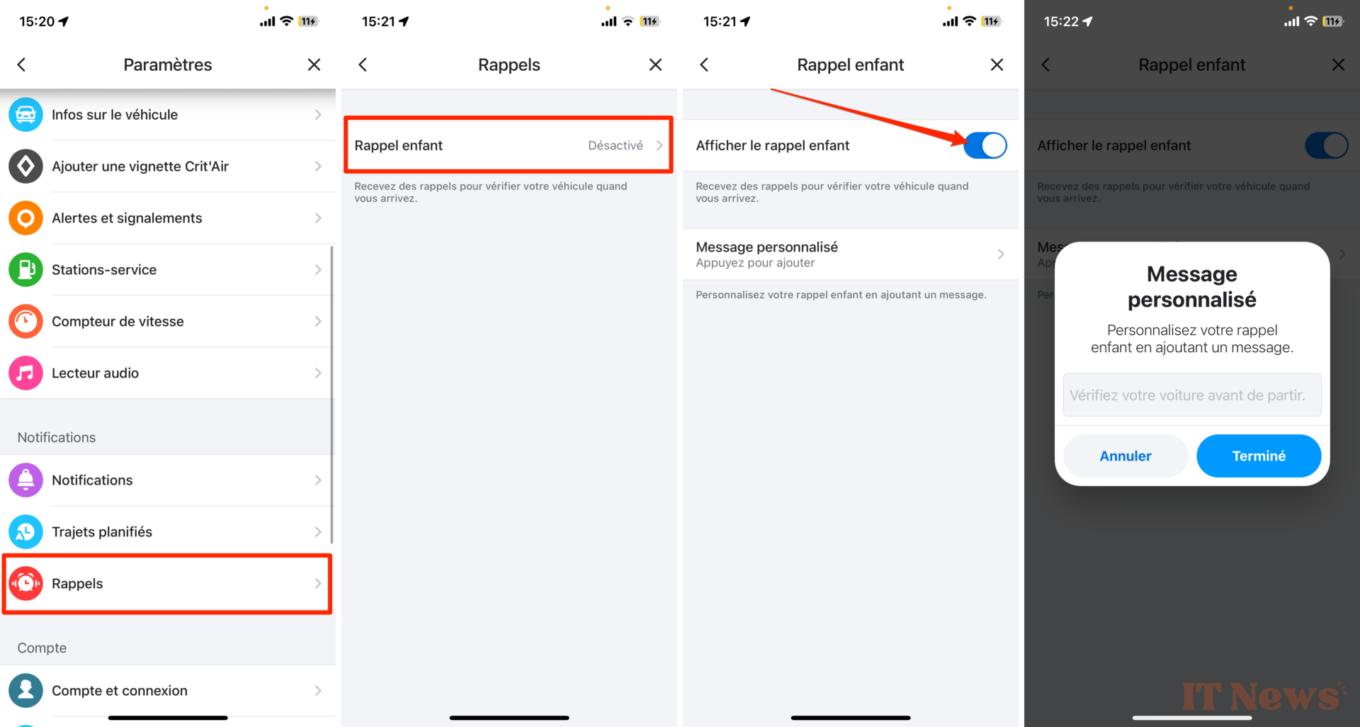
2. Don't forget your children in the back seat
Because no one is immune to this kind of mishap, you can ask Waze to display an alert to make sure you haven't forgotten your children in the back of your vehicle once you arrive at your destination. A safety option that you absolutely must activate if you happen to have to drop off your little one at daycare or school before going to work, even though your other half usually does it.
To set it up, open Waze's Settings, then in the Reminders menu, tap on Child Reminder and activate the Show child reminder option.
By selecting Custom message, you can choose the text displayed in the alert that will automatically appear at the end of each trip.
3. Find the best time to leave
To make sure you arrive on time, why not check the best time to leave? You may not know this, but Waze includes a feature that allows you to set a departure time based on the time you want to arrive. The route you choose to follow will take into account traffic forecasts and, above all, will indicate the most suitable time to ensure you arrive on time.
To do this, tap the Waze main menu, located at the top left of the window and represented by three superimposed lines. Then access the Plan a trip menu.
Create a new planned trip by tapping the appropriate button and enter your destination address. If necessary, customize the departure location and day, and in the Arrive column on the left, scroll to the arrival time.
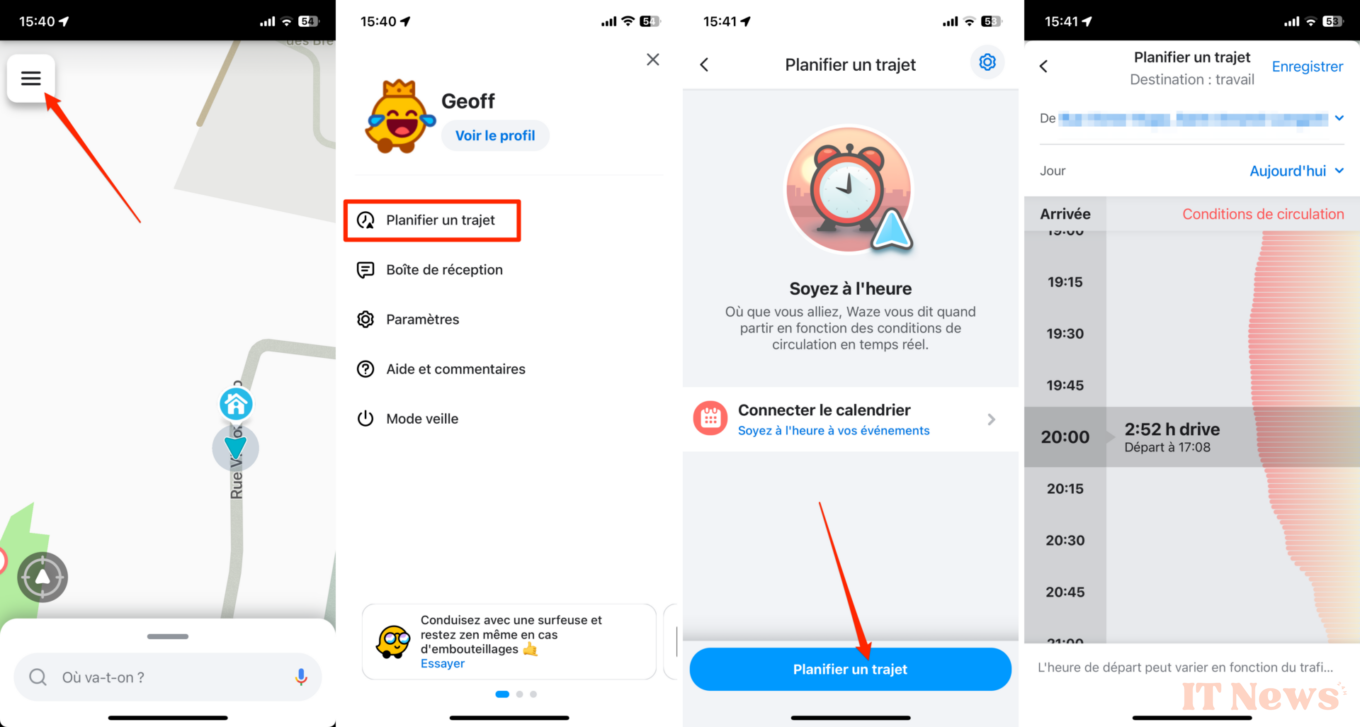
Waze automatically provides the departure time and travel time. Confirm by pressing Save. The GPS will send you an alert as soon as it's time to leave. Note that you can also choose to Connect the calendar to find all your events directly in Waze, ideal for planning your trips well in advance.
4. Add a stopover to your trip
Rather than stopping randomly in uninteresting places during your long trips, plan your breaks in advance by choosing a place to stop before leaving by adding a stopover to your trip.
Start a route to your final destination, and press the magnifying glass to search for a new location. When you confirm the address of the new location, select Add a stop from the Navigation options menu that appears.

Waze will then recalculate the route taking your stop into account. The different parts of the journey will be recognizable by their color difference on the map.
5. Use Google Assistant while driving
Since Waze is owned by Google, the app shares several features with Google Maps. This is the case, for example, with Google Assistant, which now replaces the old voice command.
To activate it, open the Waze main menu, represented by three overlapping lines, and enter Settings. Then go to the Voice and sound menu, then select Google Assistant.
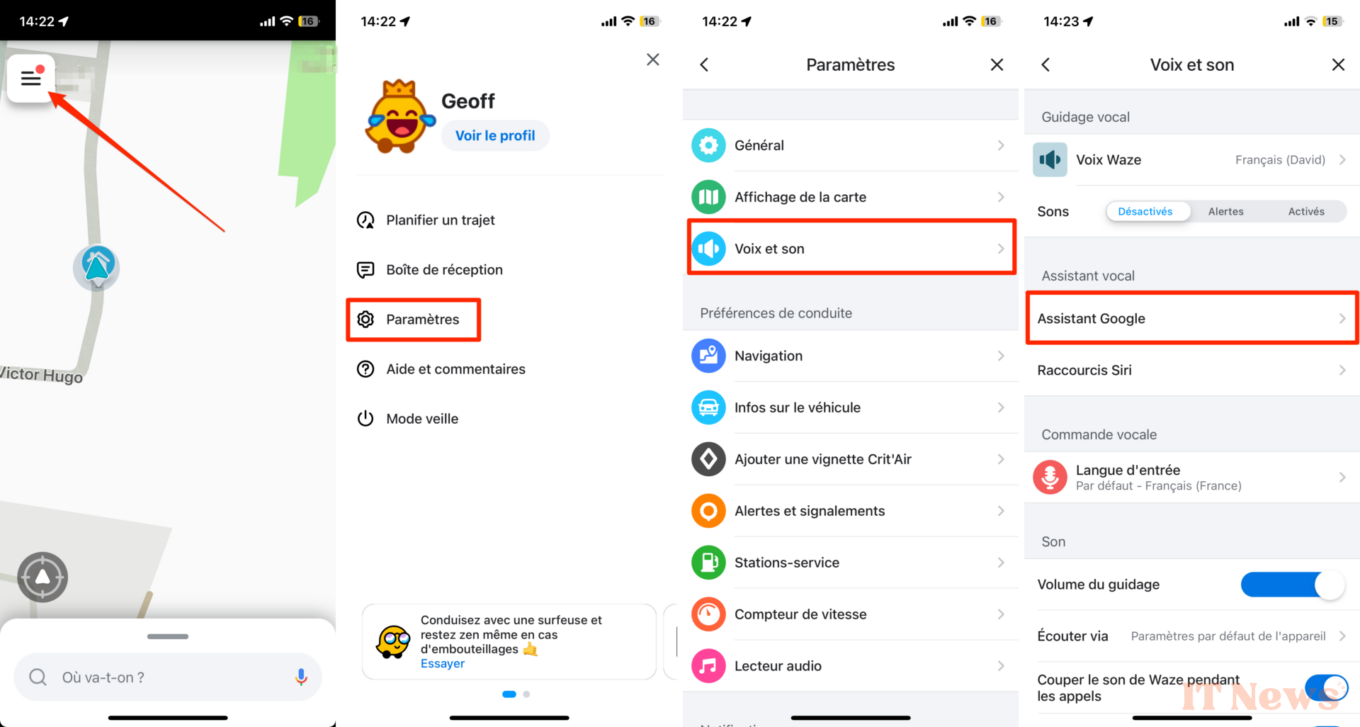
Then make sure that all the options are enabled. You can use Google Assistant while driving, by activating it via the dedicated button on the map, or by calling it with the command “OK Google”. Also, don't forget to enable the Share current trip info option so you can get answers about the trip you're taking.
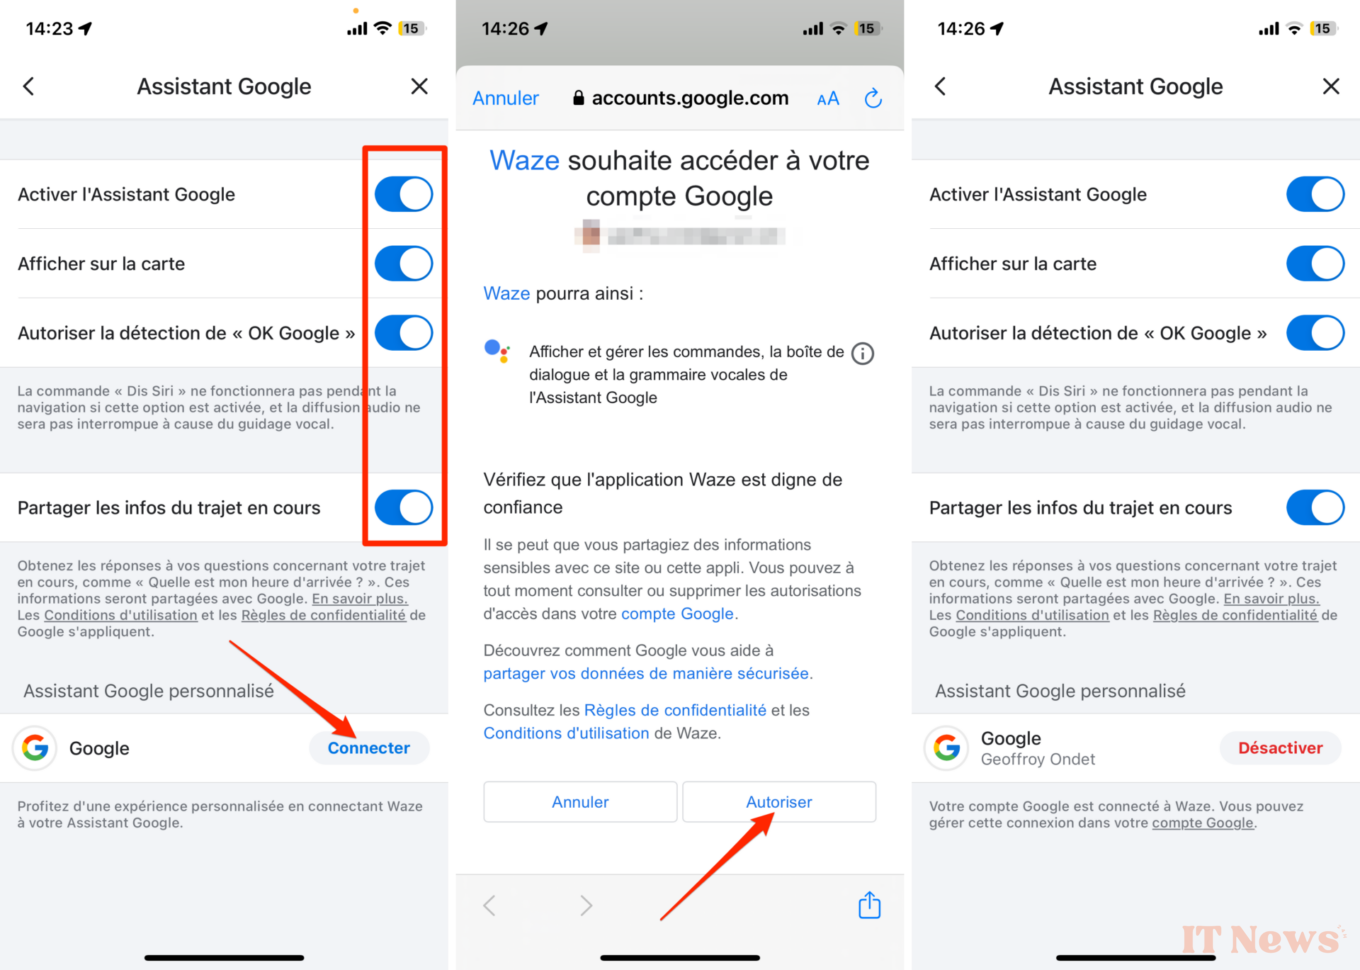
Finally, if you wish, you can Connect your Google account to Waze, and Authorize Waze to access it in order to get a better experience Personalized with the Google Assistant.
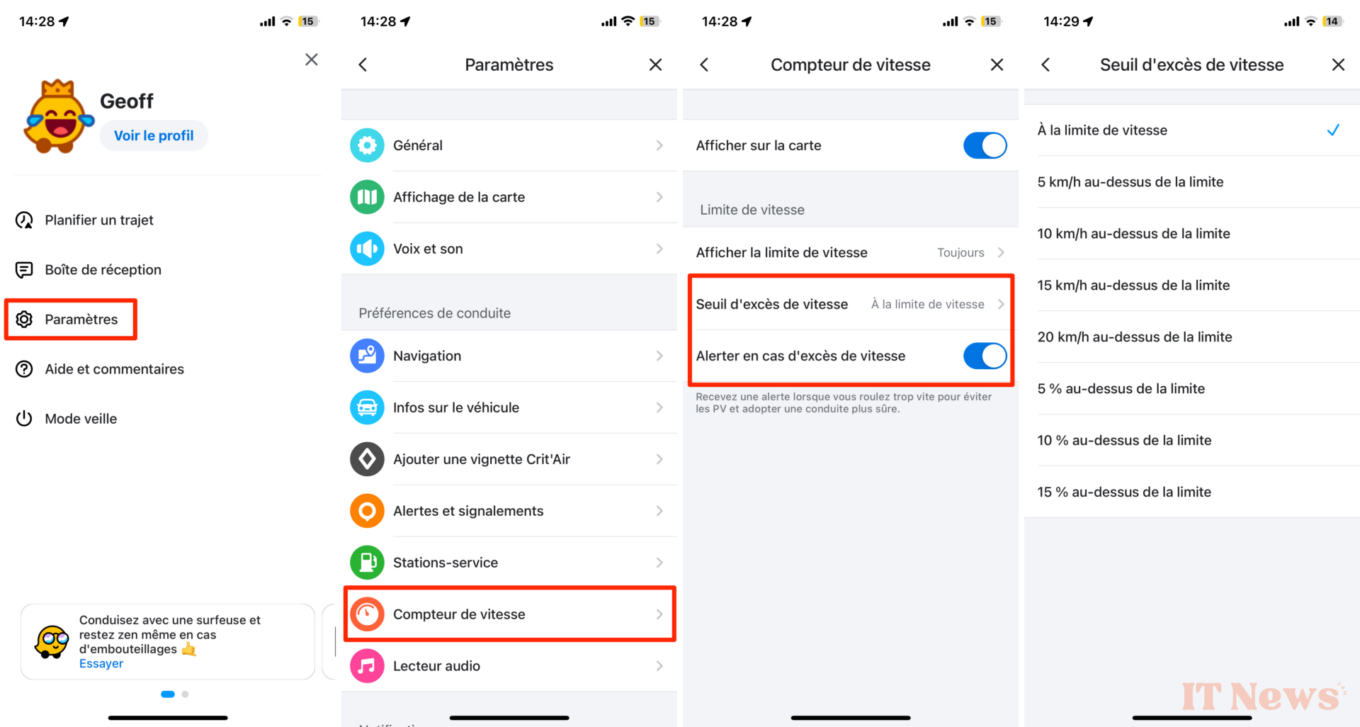
6. Set up a speeding alert
If you only have a few points left on your driving licence, you'd probably be better off taking it easy and keeping an eye on your speedometer. To avoid having to go to driving school again, you can configure Waze to sound a speeding alert when you're a little too heavy-handed.
To do this, go to the app's Settings, then under Speedometer, activate Alert when speeding. Then go to the Speeding Threshold menu, and select the speed limit for which you want to trigger the alert.
7. Customize the guidance voices
Have you always dreamed of lending your voice to a blockbuster? Rejoice, because you'll be able to practice by lending your voice to Waze's voice guidance.
To record your own voice in Waze, open the app's Settings, enter the Voice and Sound menu, and go to the Waze Voice menu.
Then tap Add Voice and confirm the safety alert by tapping OK. You must record all the announcements and guidance phrases offered by the application one by one.

Touch the first announcement and press the record button. Speak the announcement clearly and press Stop. You can check if your recording is satisfactory by pressing the Play button. When you're happy with the ad, tap Save.
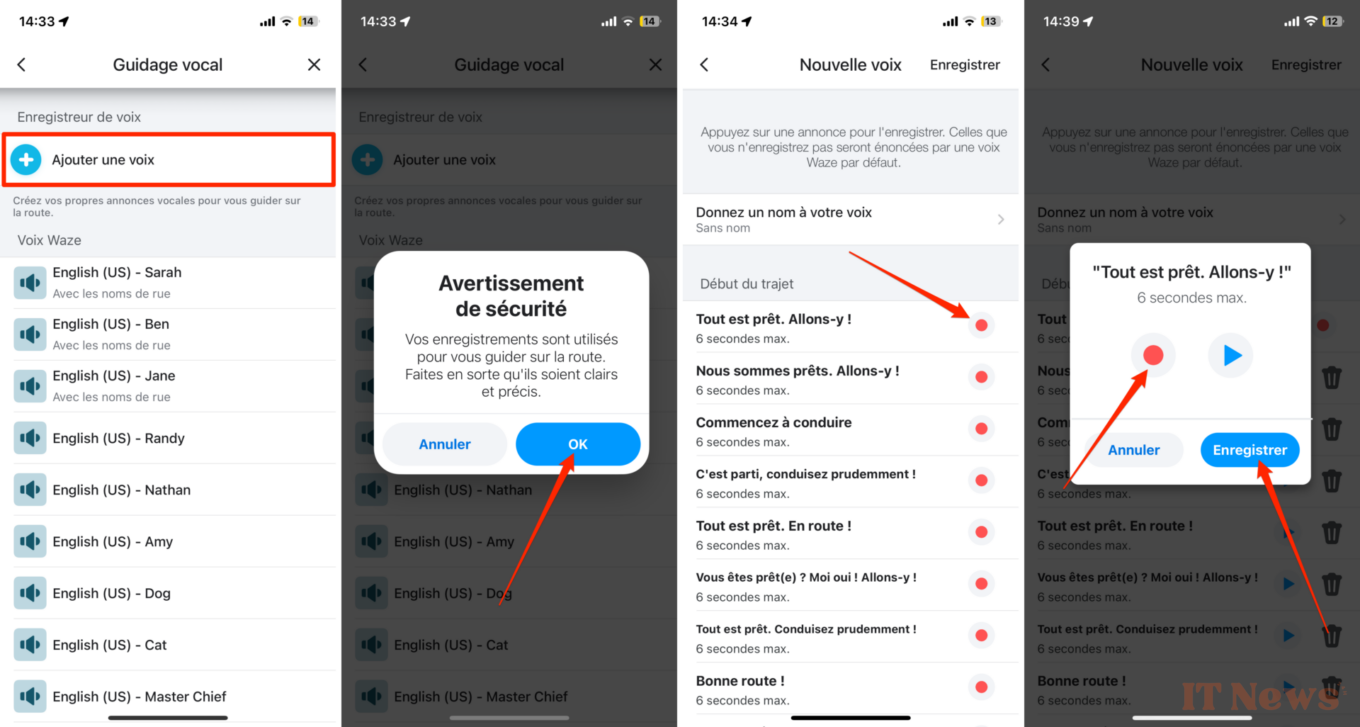
Repeat for each ad. Give your voice a name by tapping Give your voice a name, and save it by tapping Save in the top right corner.
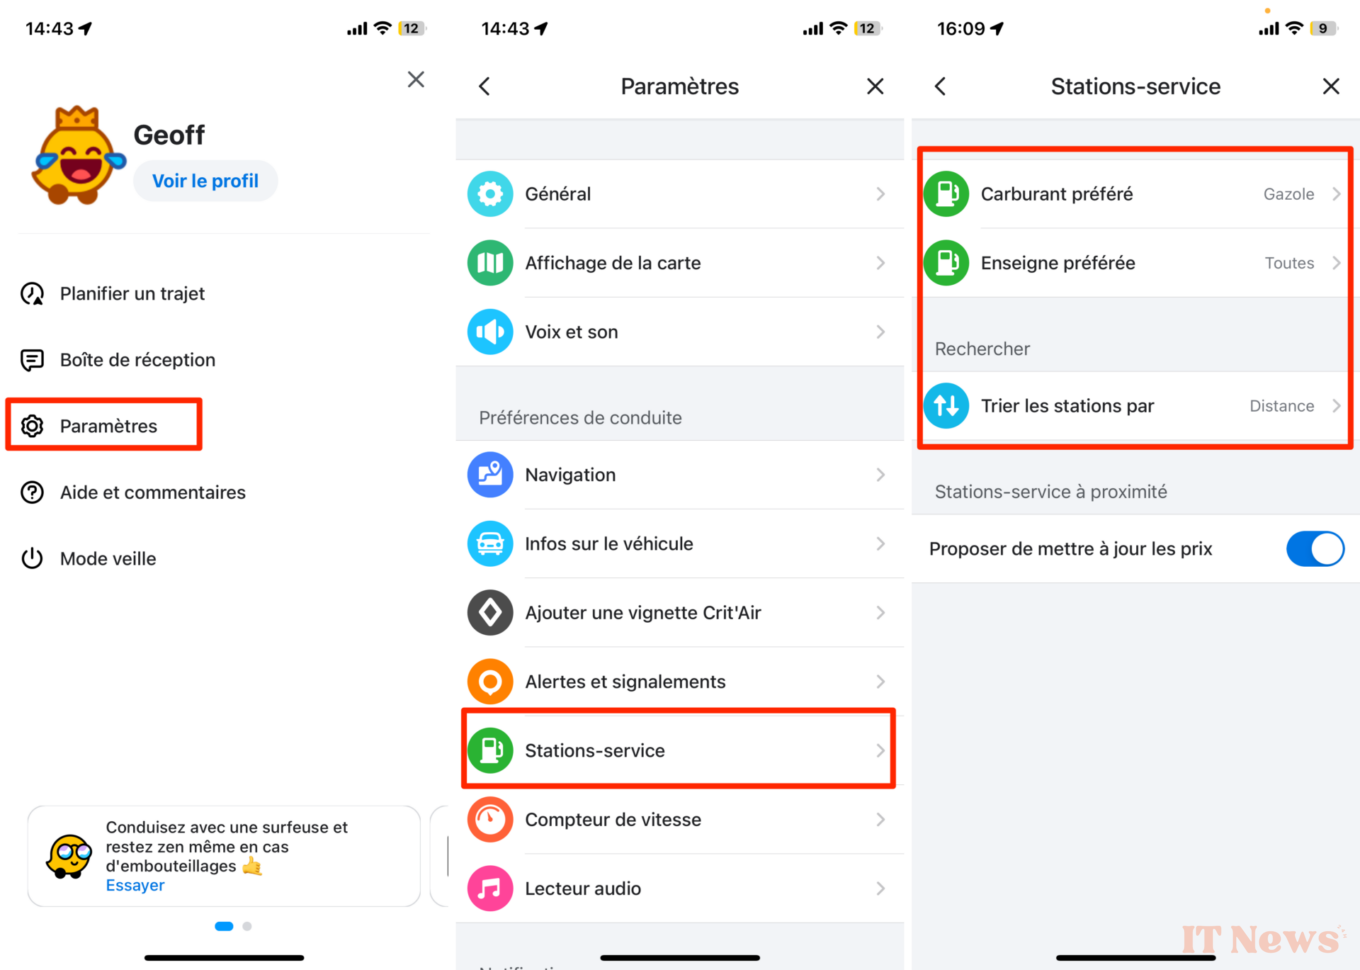
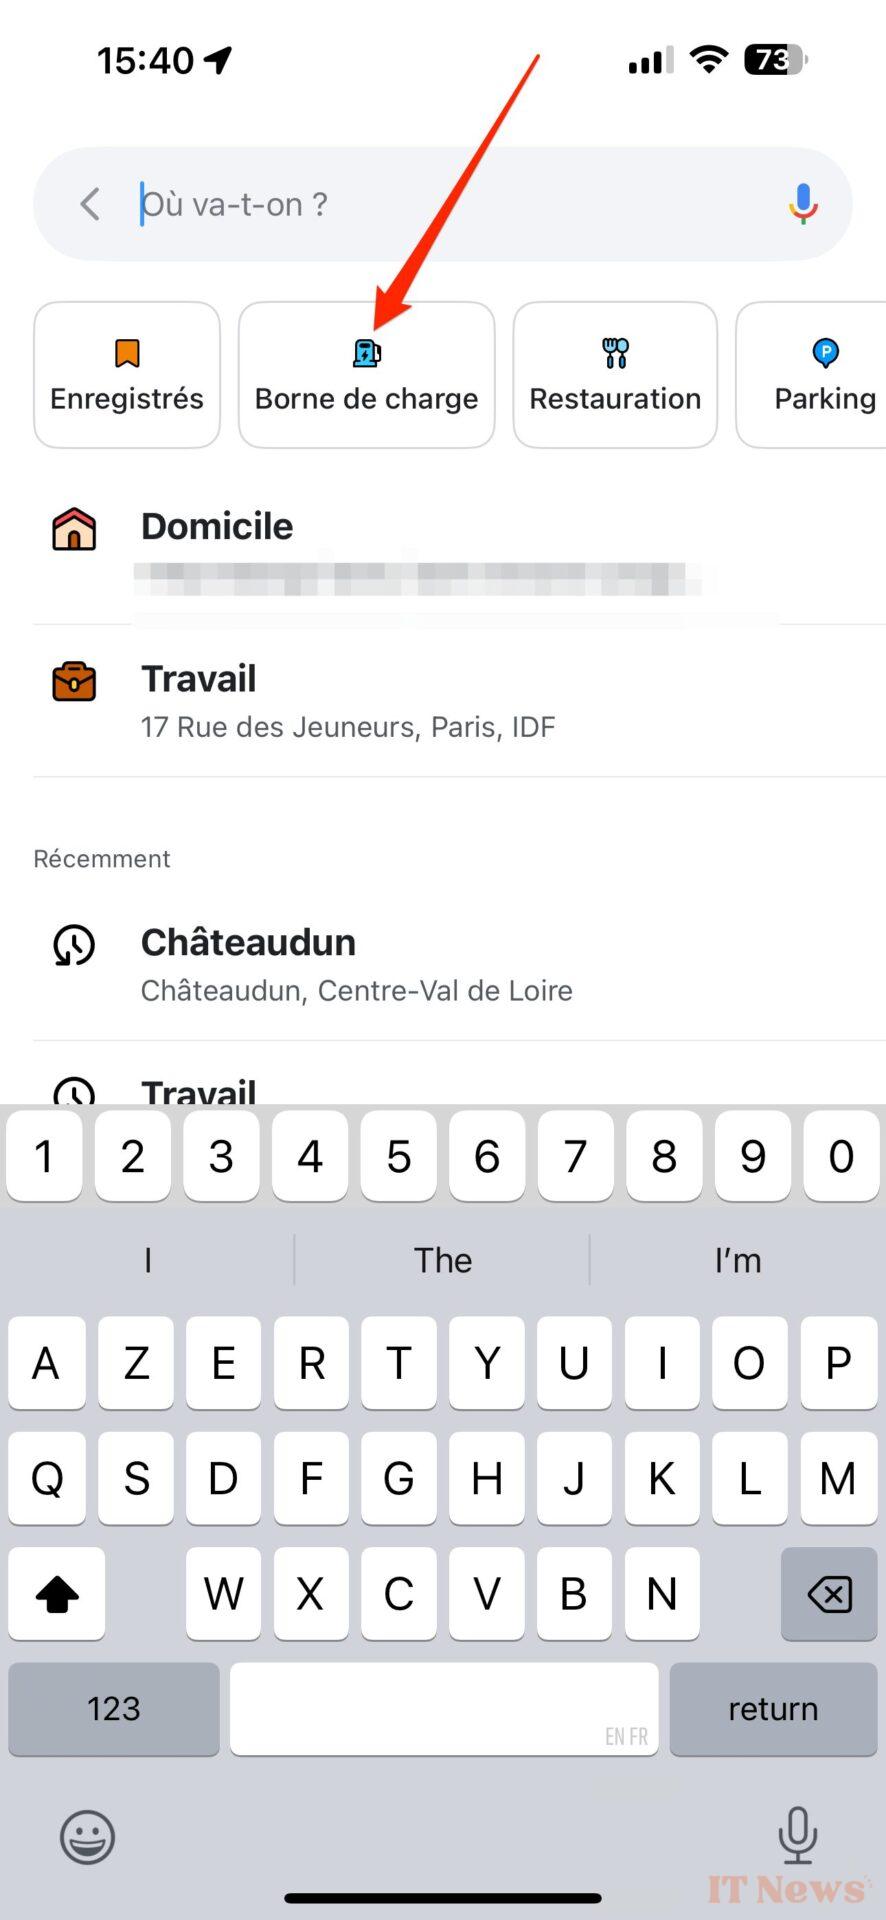
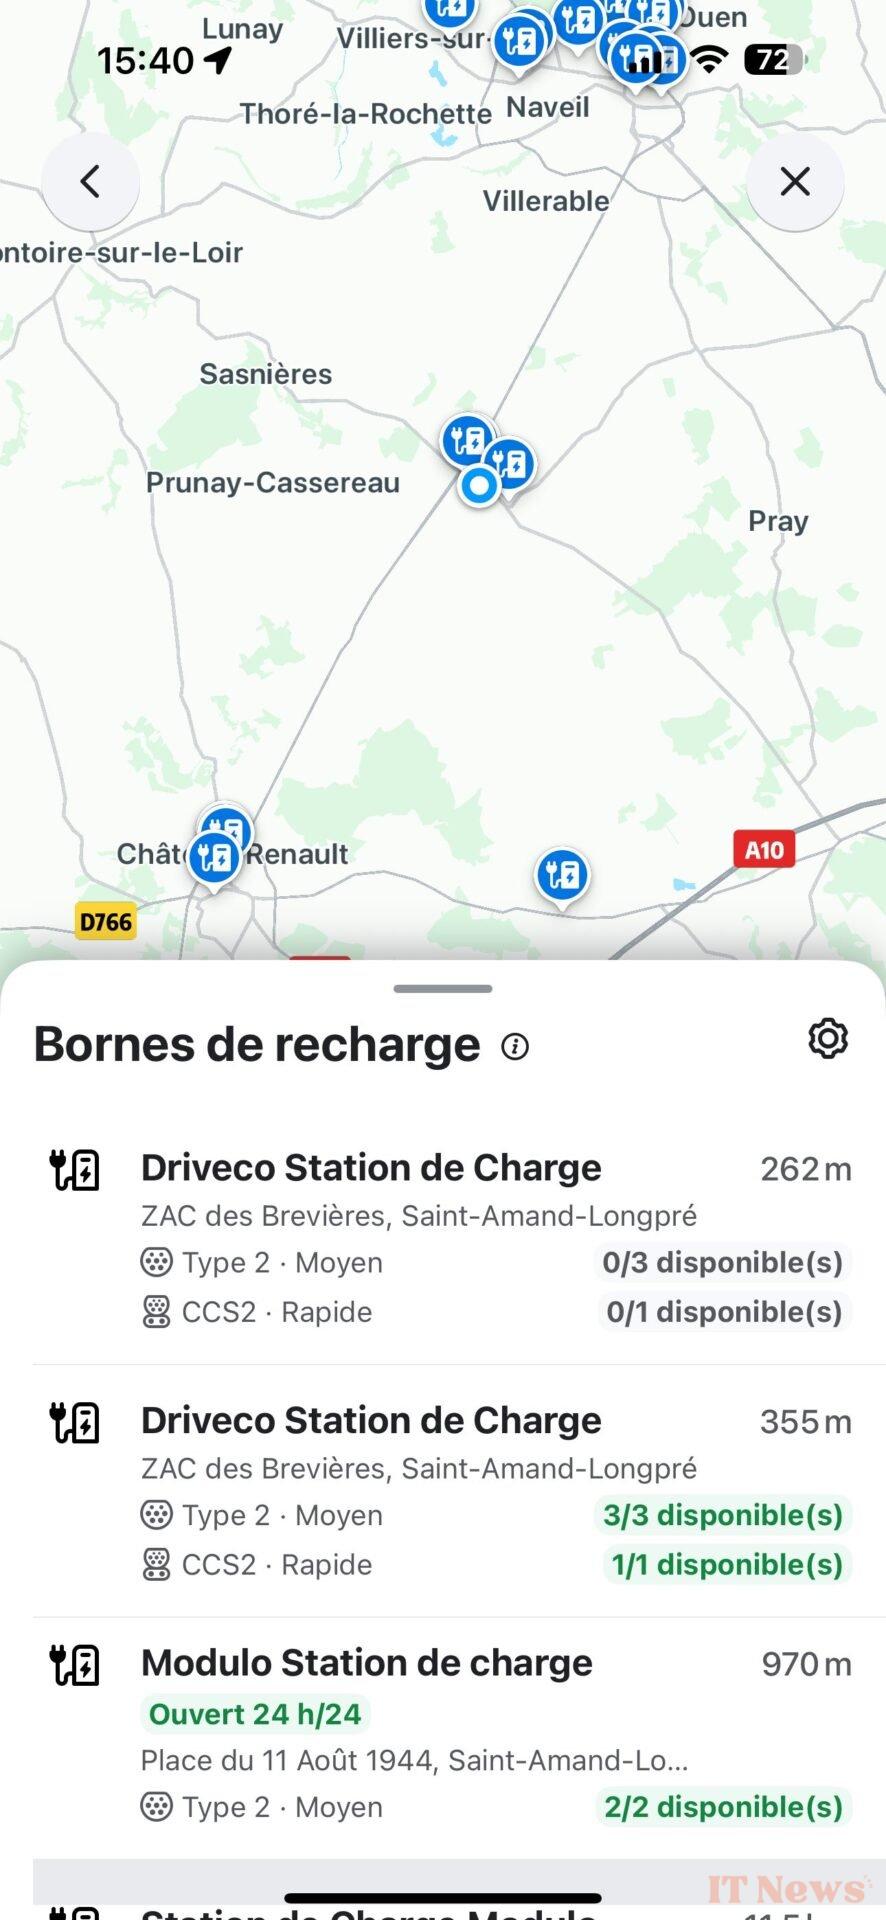
8. Find a gas station or charging station
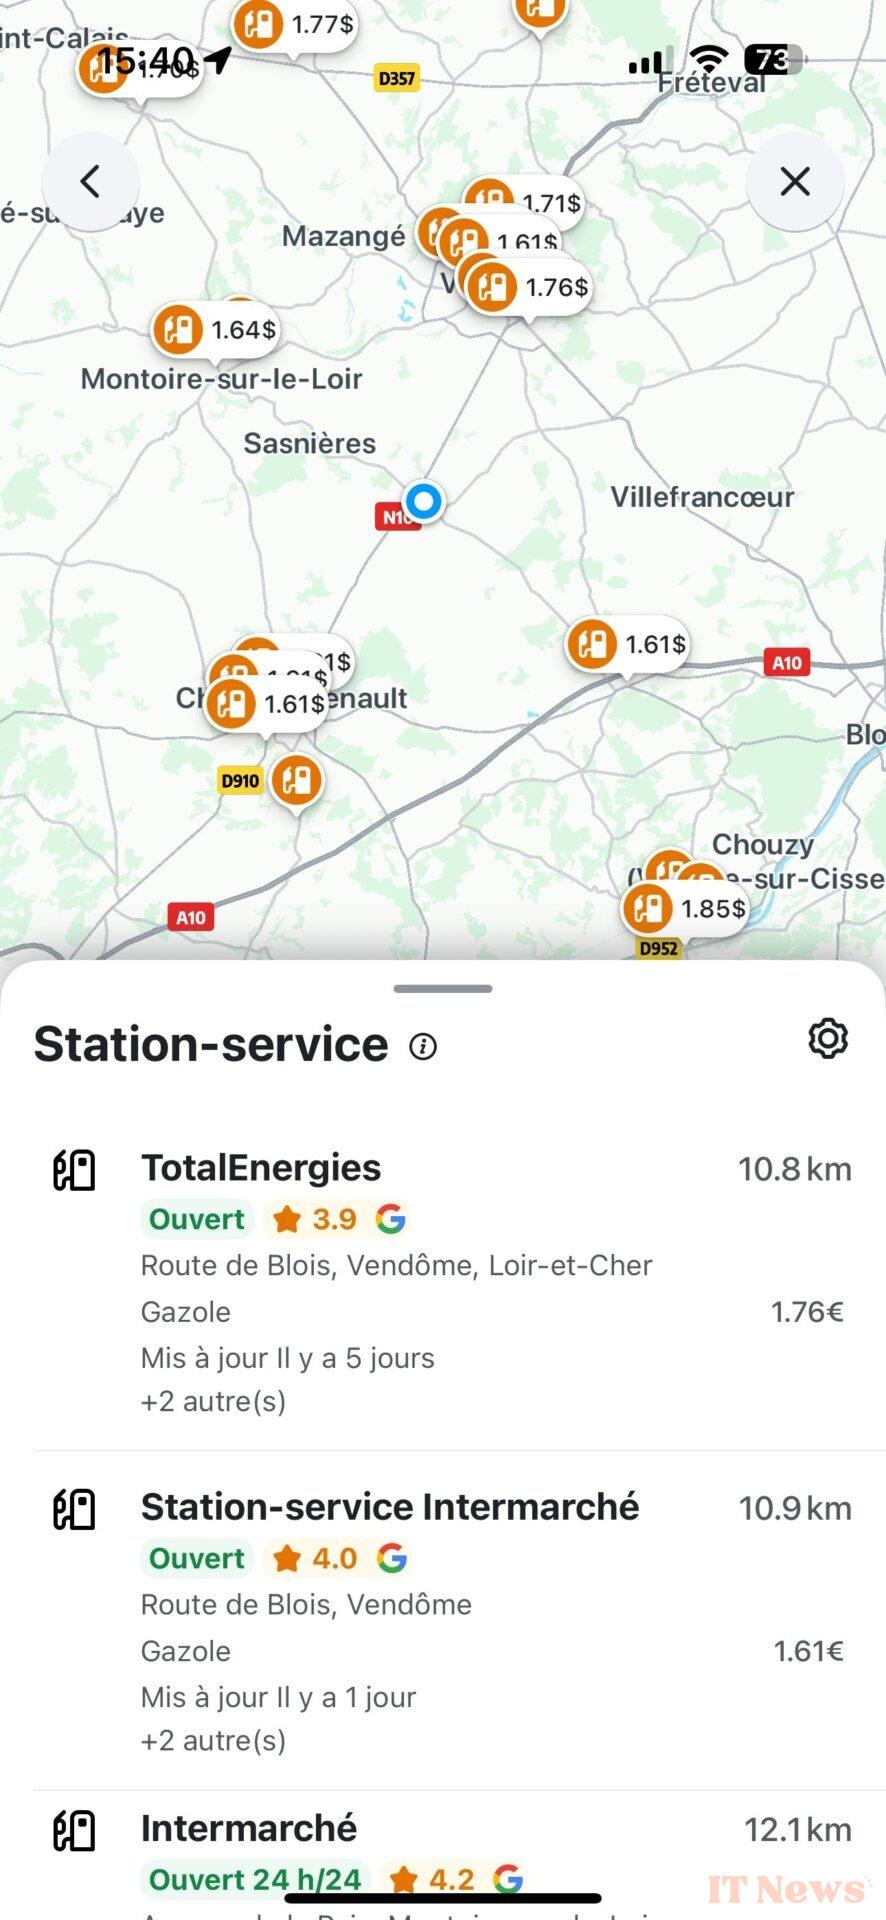
Don't wait until you run out of gas to find a gas station. Waze lets you search for a station near you while you navigate. To take full advantage of it, you will first need to customize your preferences.
Enter the Settings of the application, then in the Gas Stations menu, choose your Preferred Fuel and, if you wish, customize the sorting by price, distance or brand and select a favorite brand.
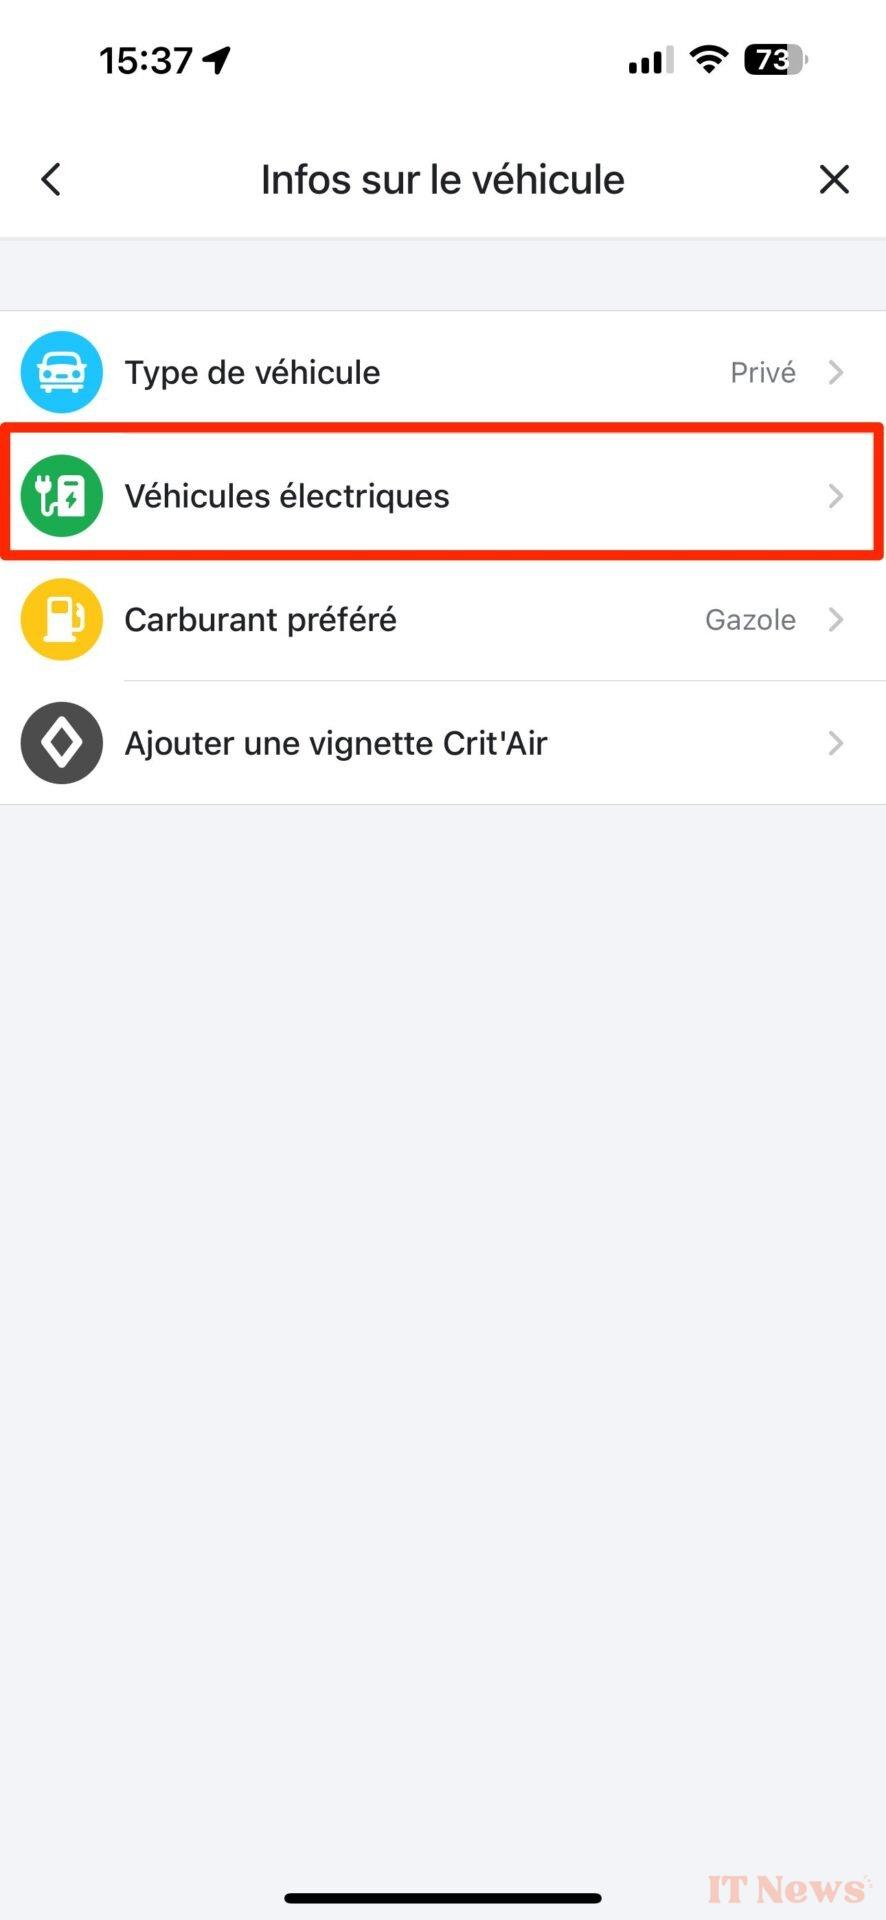
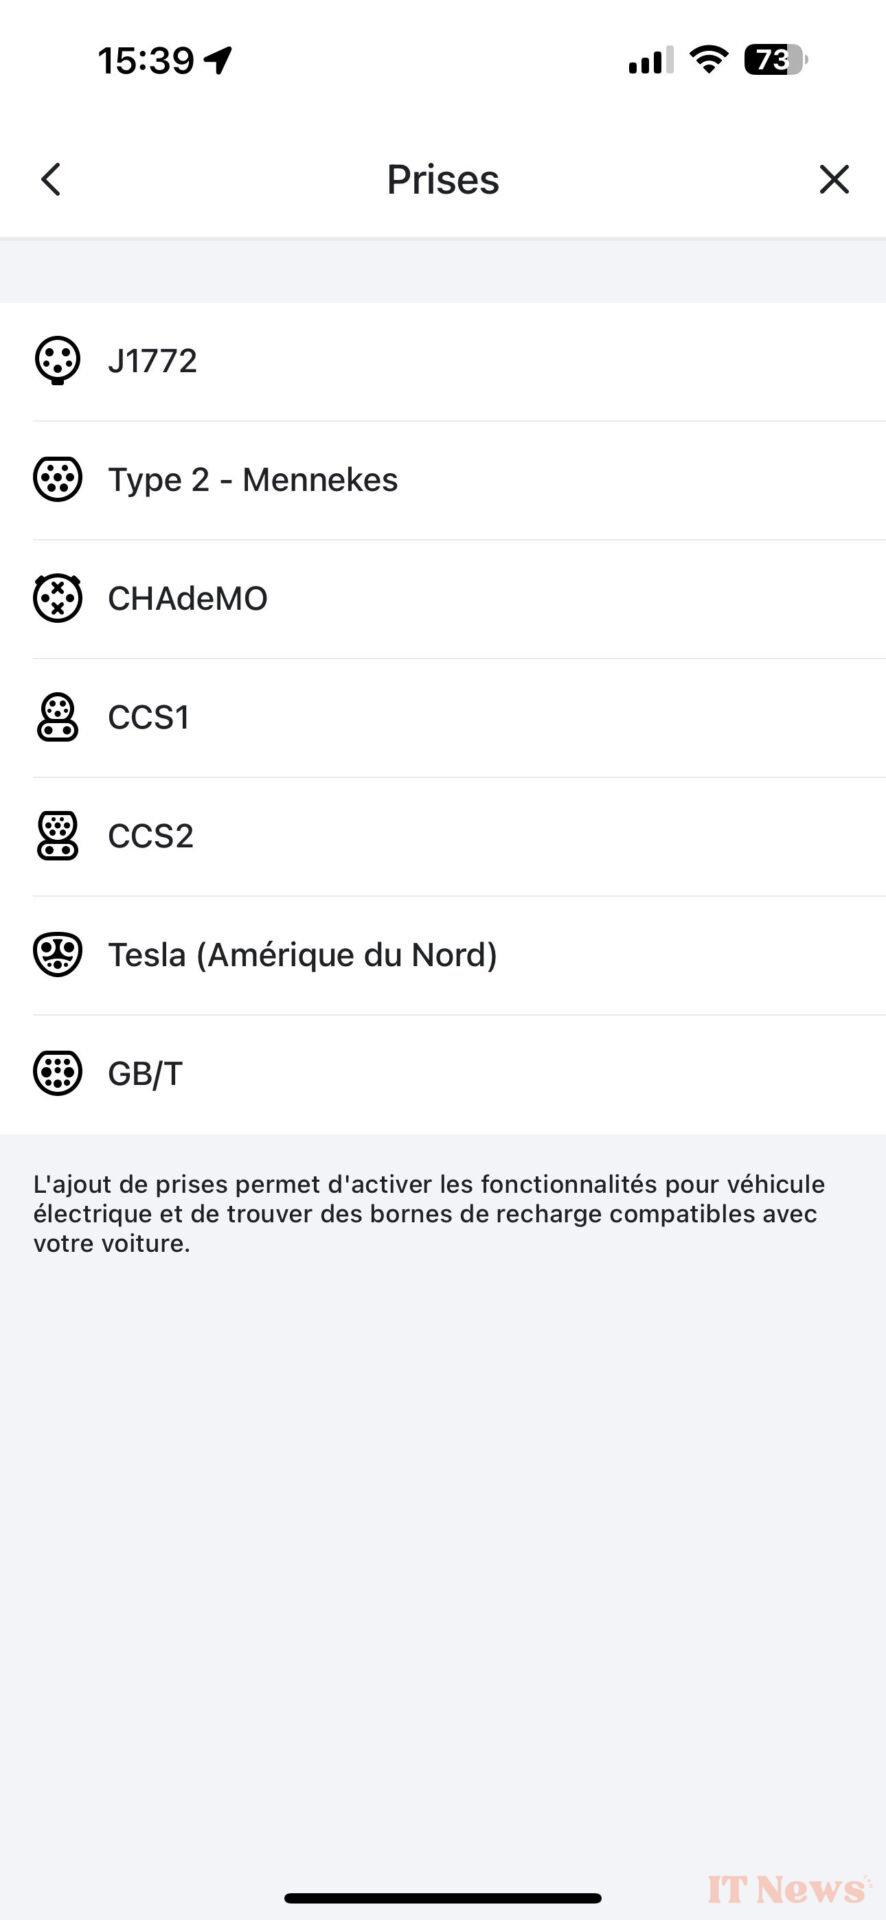
If you own an electric vehicle, you will need to tell Waze to enable the dedicated feature. To do this, go to Settings, then to Vehicle Info, select Electric Vehicles. Then choose to Enable electric vehicle features, then select the plugs you are interested in as well as the Charging Networks you prefer.

Return to the main page, or switch to navigation mode, tap the search field and select Fuel or Charging station. You will then see the list of available stations around you. All you have to do is select the one that suits you best to open a route to it or to add a stop to your journey.
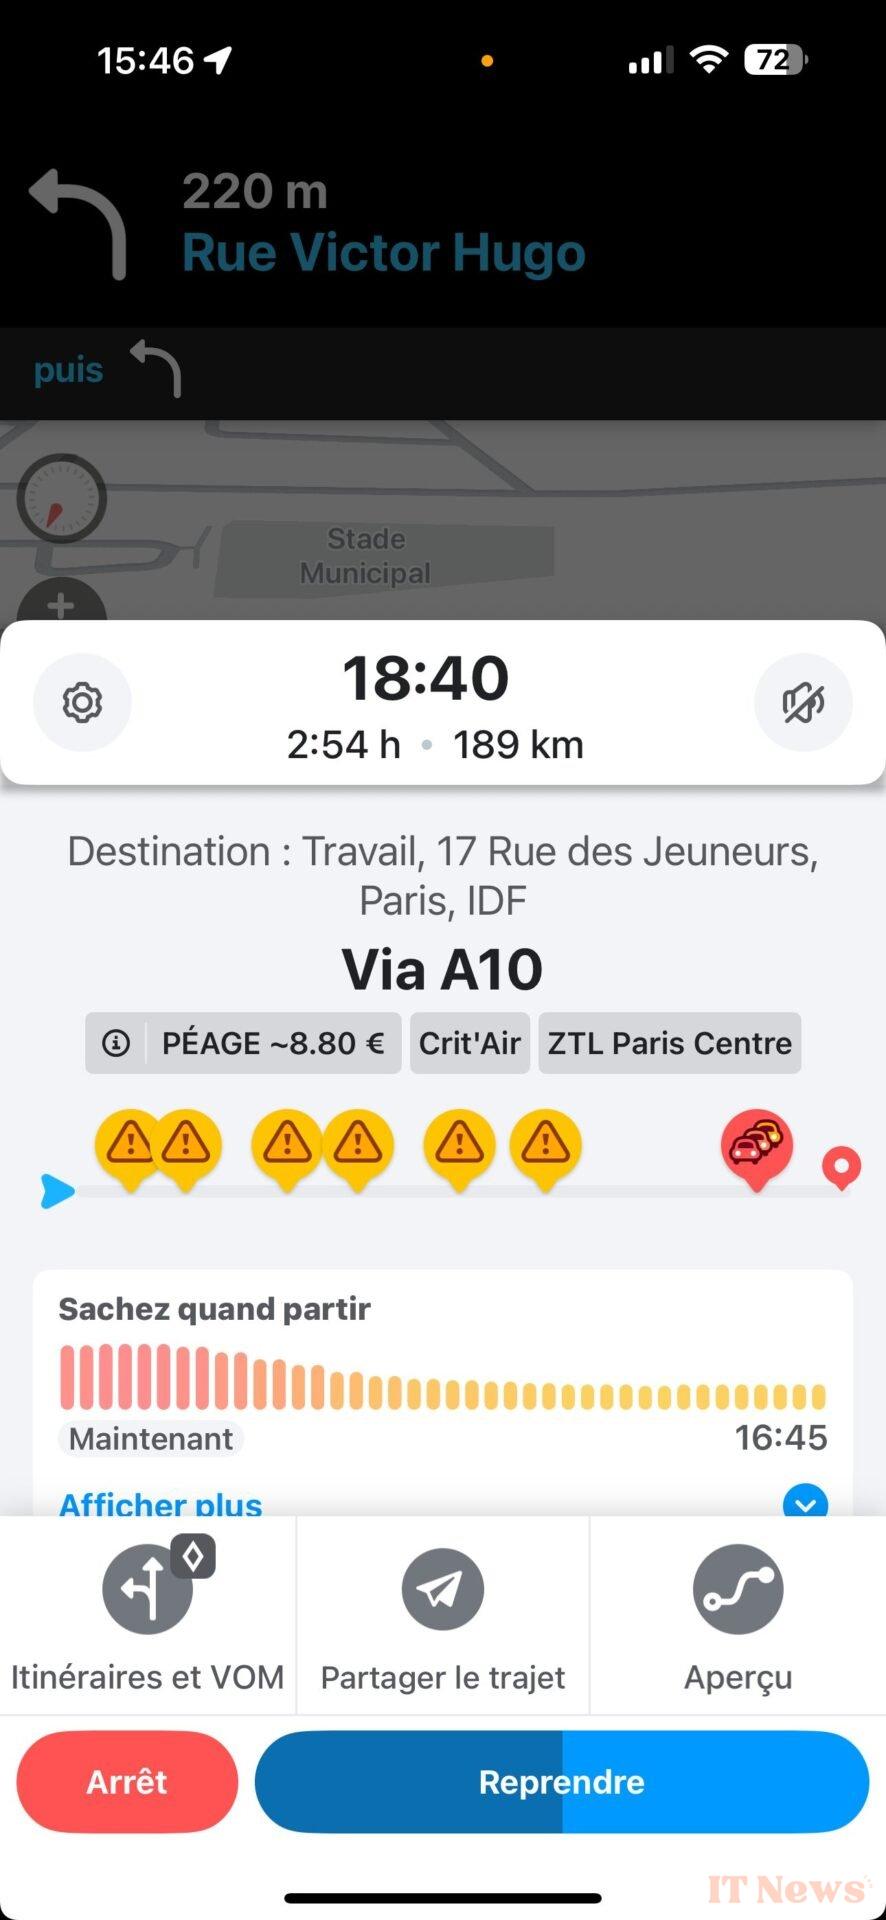
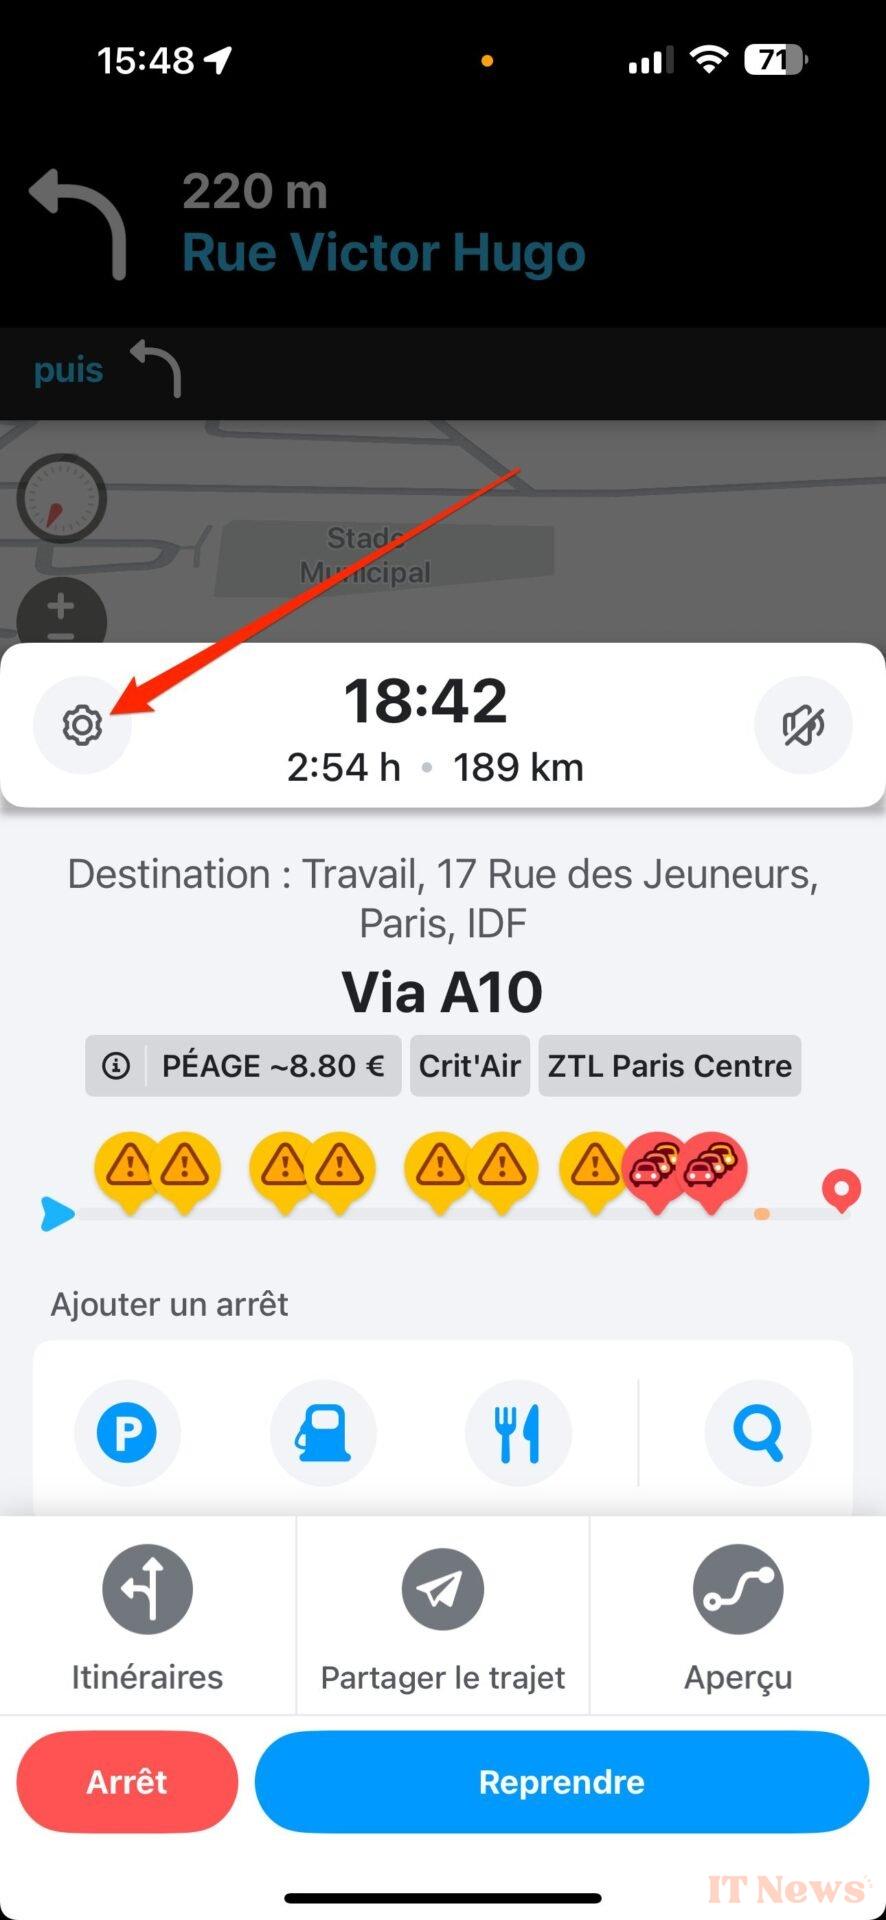
9. Take an alternative route
By default, Waze selects the fastest route to get you to your destination. However, you can choose to take an alternative route by consulting the list of other possible routes.
To do this, while navigating, expand the bottom panel and tap Route. After quickly calculating alternative routes, Waze displays the list of all possible routes. This way, you can consciously choose a route that will cost you less and won't take you much longer.

10. Save money by avoiding tolls
Beyond saving substantial money, avoiding tolls will also allow you to reduce your fuel consumption, and in some cases, even reach your destination almost as quickly.
To take a route without tolls, search for a route, then when selecting it, press the Avoid button displayed in the top left corner of the screen. You can then choose to Avoid toll roads, or Avoid ferries.
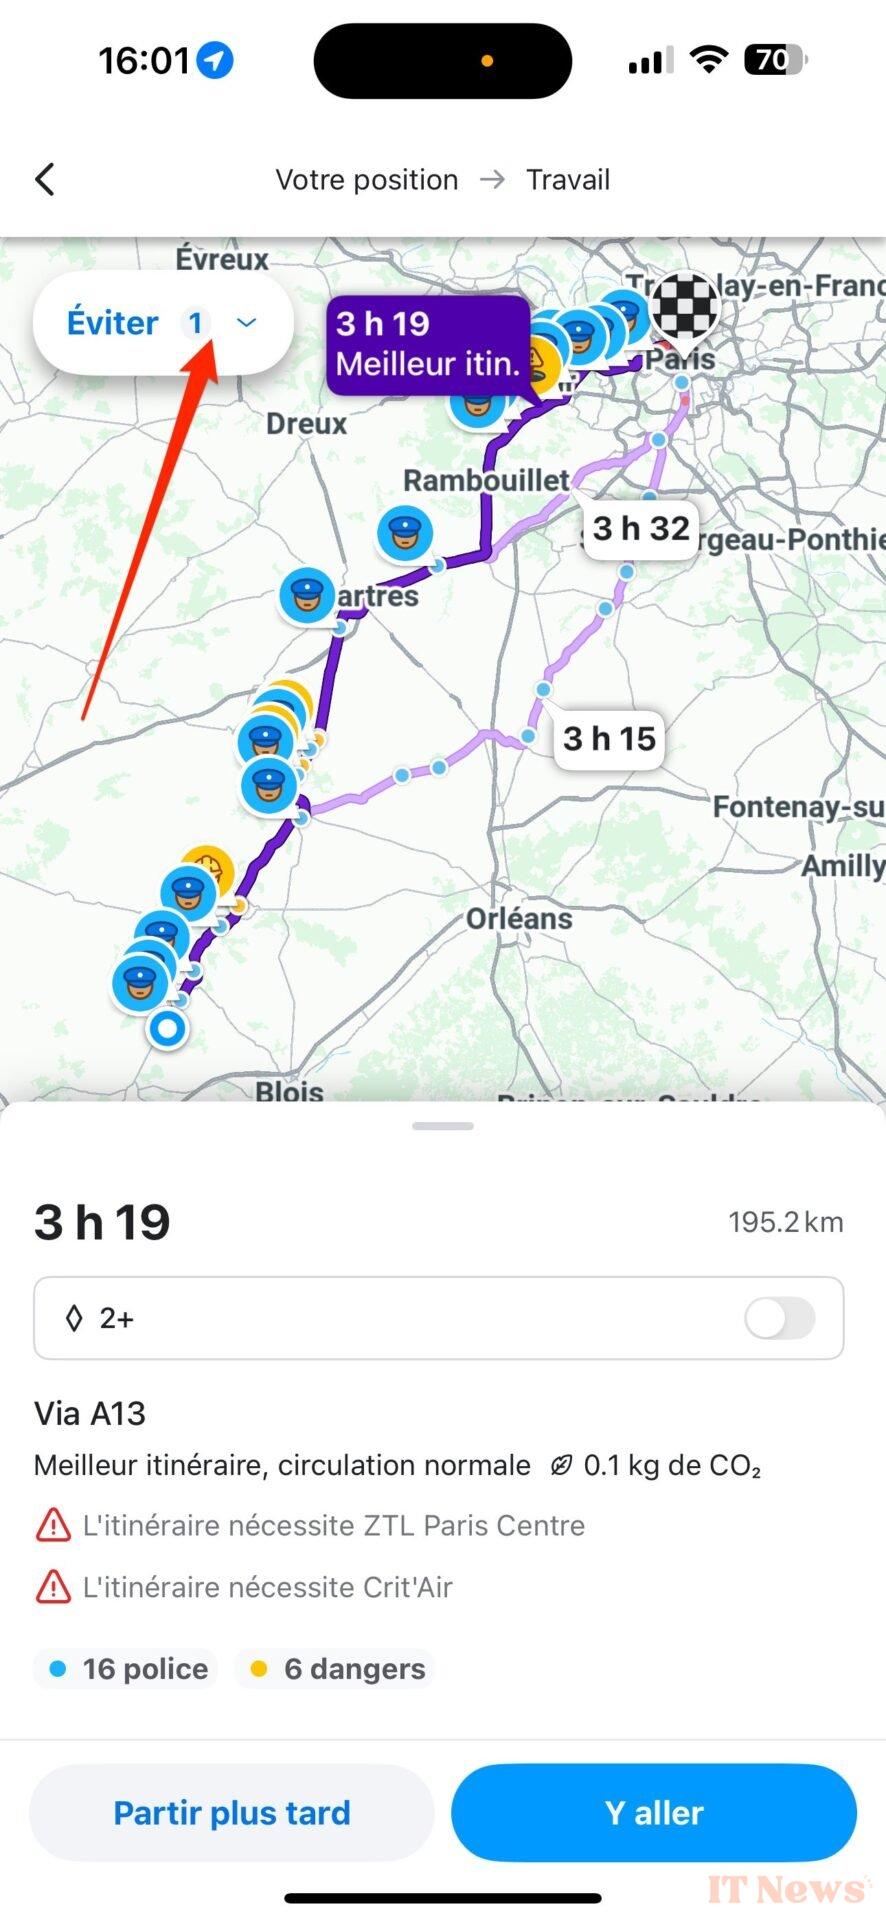

This setting can also be enabled during navigation (if you have already started your route). To do this, expand the lower panel and enter Waze's Settings. Then go to Navigation to enable the Avoid Tolls option. Then return to navigation mode. Waze should automatically recalculate possible routes excluding tolls.
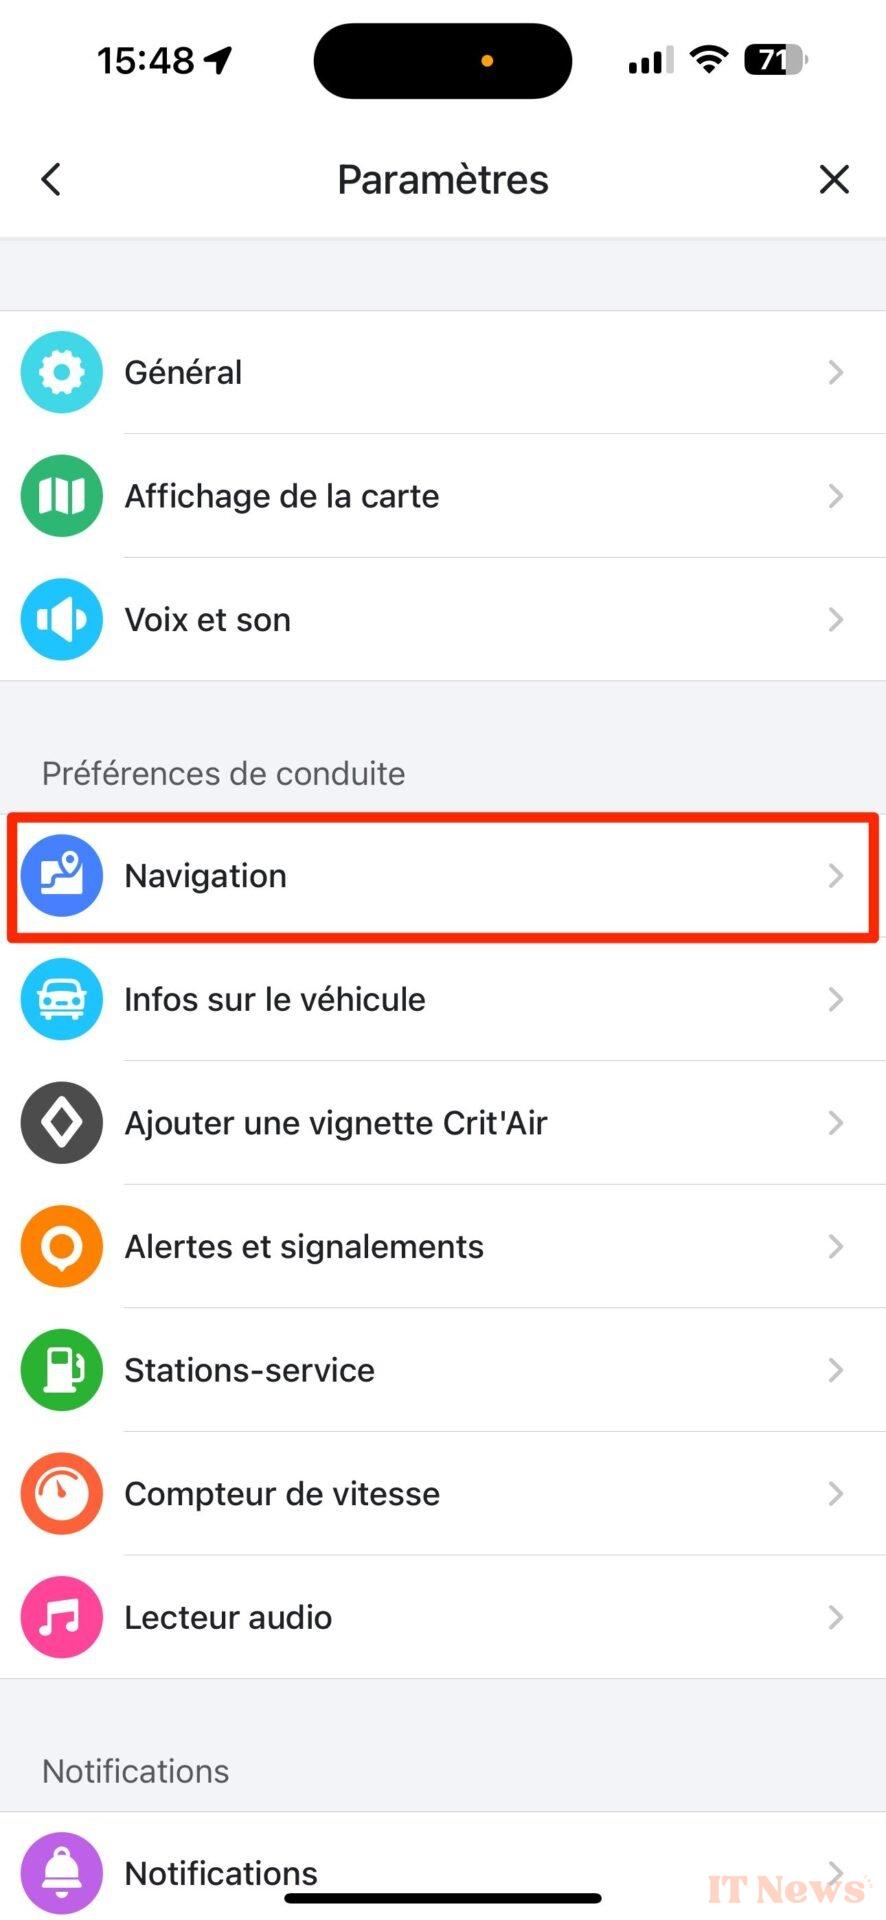
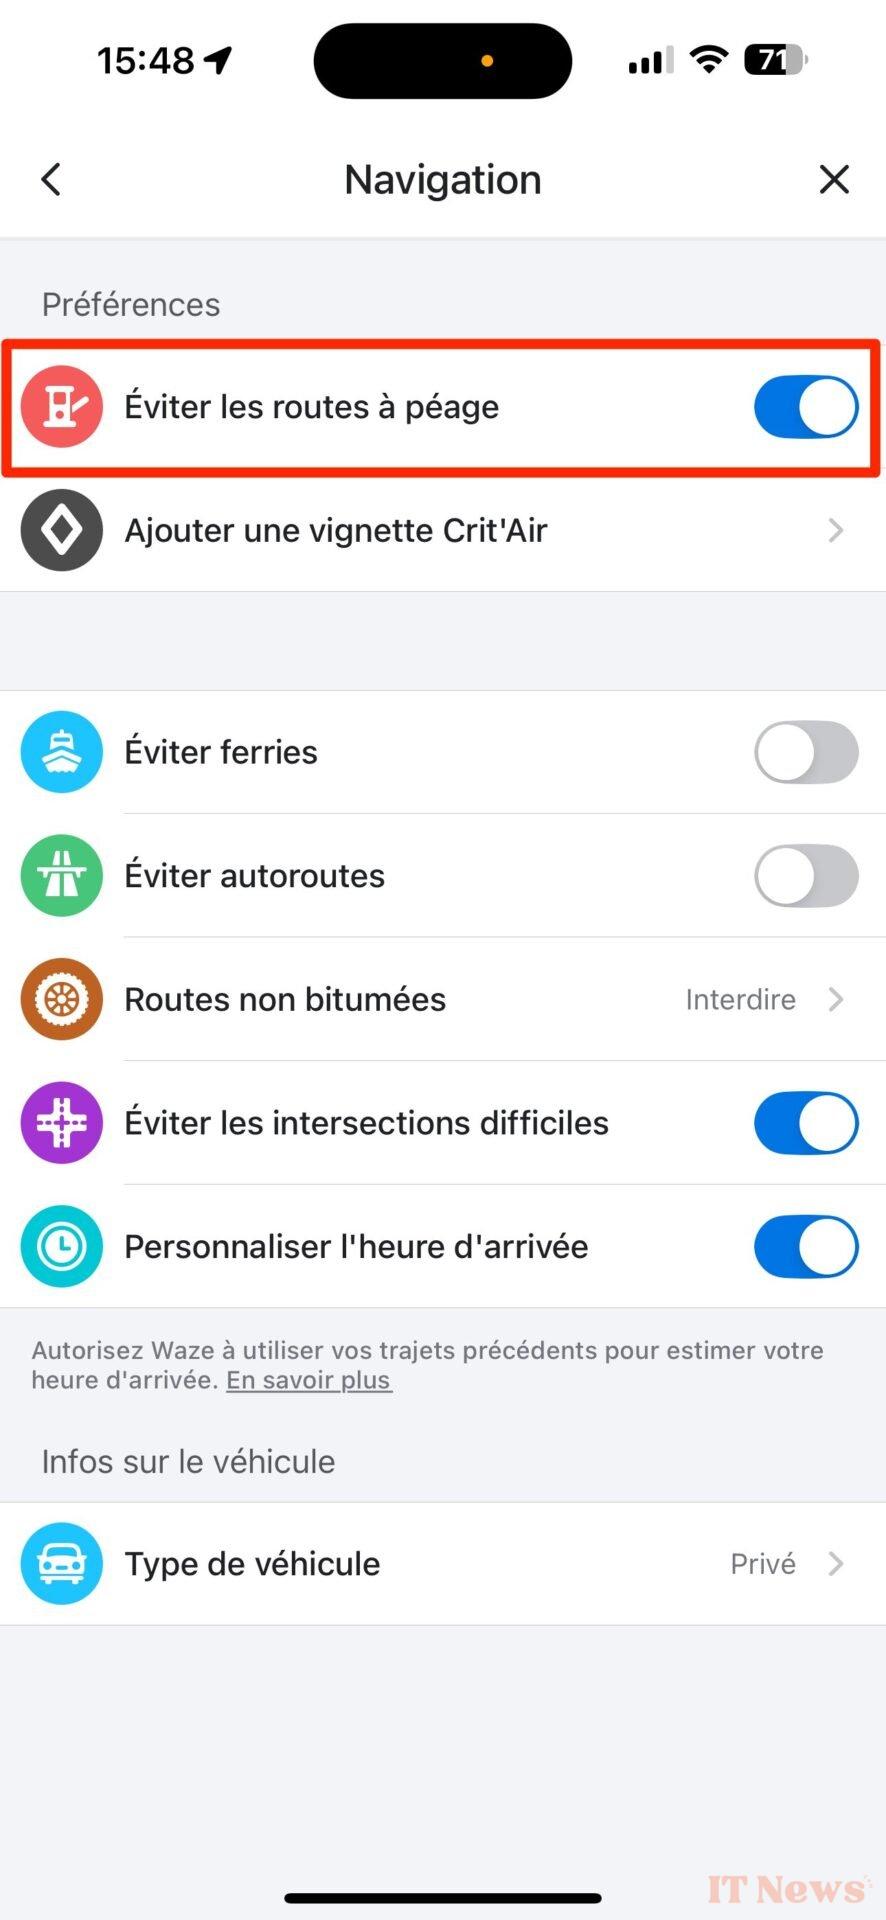
Be careful, however, avoiding tolls will not necessarily mean you avoid motorways if they are free. If you absolutely do not want to use them, open Settings, then in the Navigation menu, activate the Avoid motorways option.
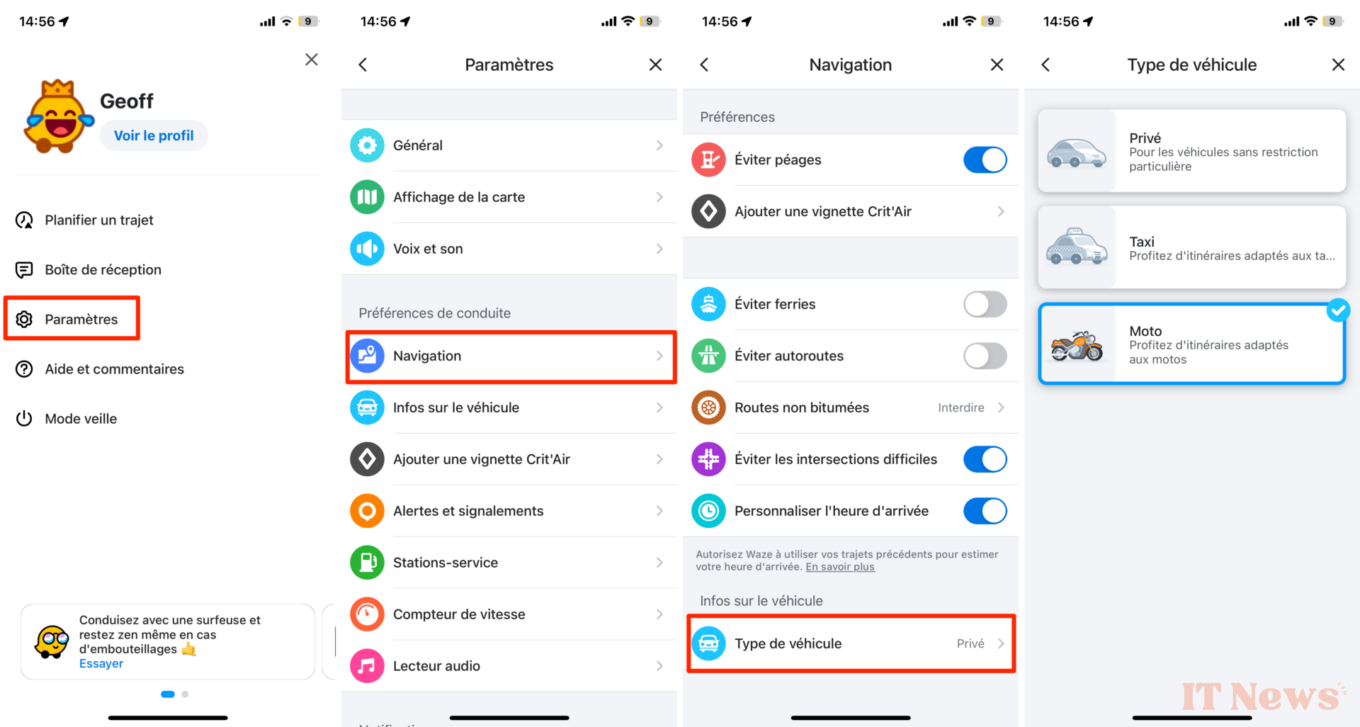
11. Configure routes based on your vehicle
Are you planning to use Waze on a motorcycle? The application has a dedicated mode which, once activated, will adapt the calculation of routes, and in particular their duration, taking into account the fact that you are traveling on two wheels, and that you can therefore dodge traffic jams more or less easily.
To activate it, open Waze's Settings, then in the Navigation menu, go to Vehicle type and select Motorcycle. If you are a taxi driver, Waze will also be able to adapt your routes according to the lanes reserved for you.
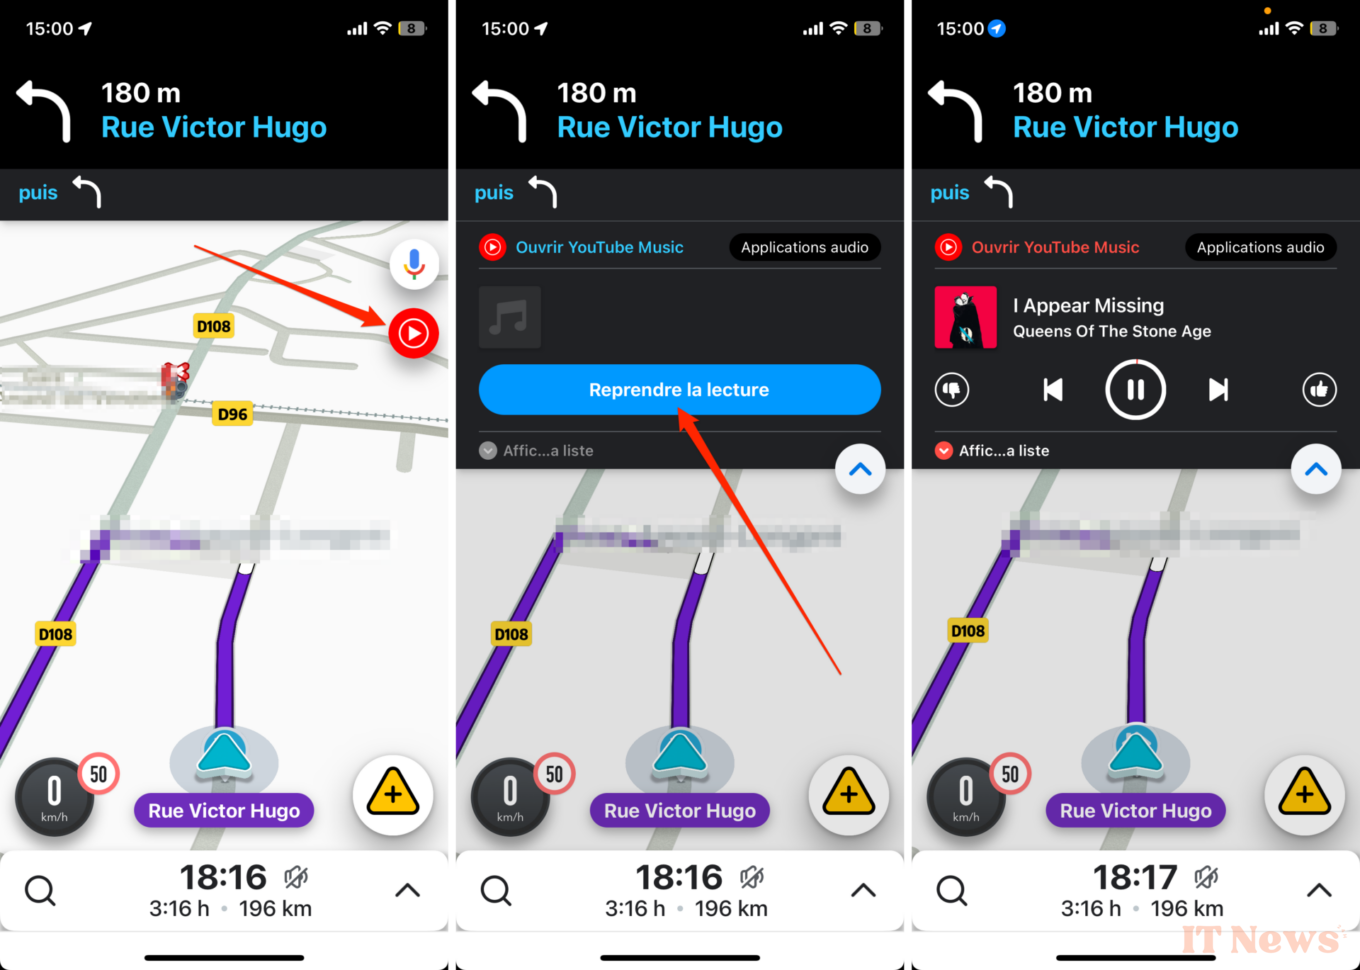
12. Configure your audio player
While it is strongly recommended to listen to the radio station dedicated to highways if you use them, nothing prevents you from enjoying your favorite music when there are no shadows on the horizon.
Waze supports many audio streaming applications like Spotify, Deezer, Apple Music, YouTube Music and many others. If you listen to music or podcasts with an application installed on your device, you can probably connect Waze to control it directly from the GPS interface.
To do this, enter the Settings of the application then access the Audio Player menu. Make sure the Show audio player icon option is checked, then select your audio player application.
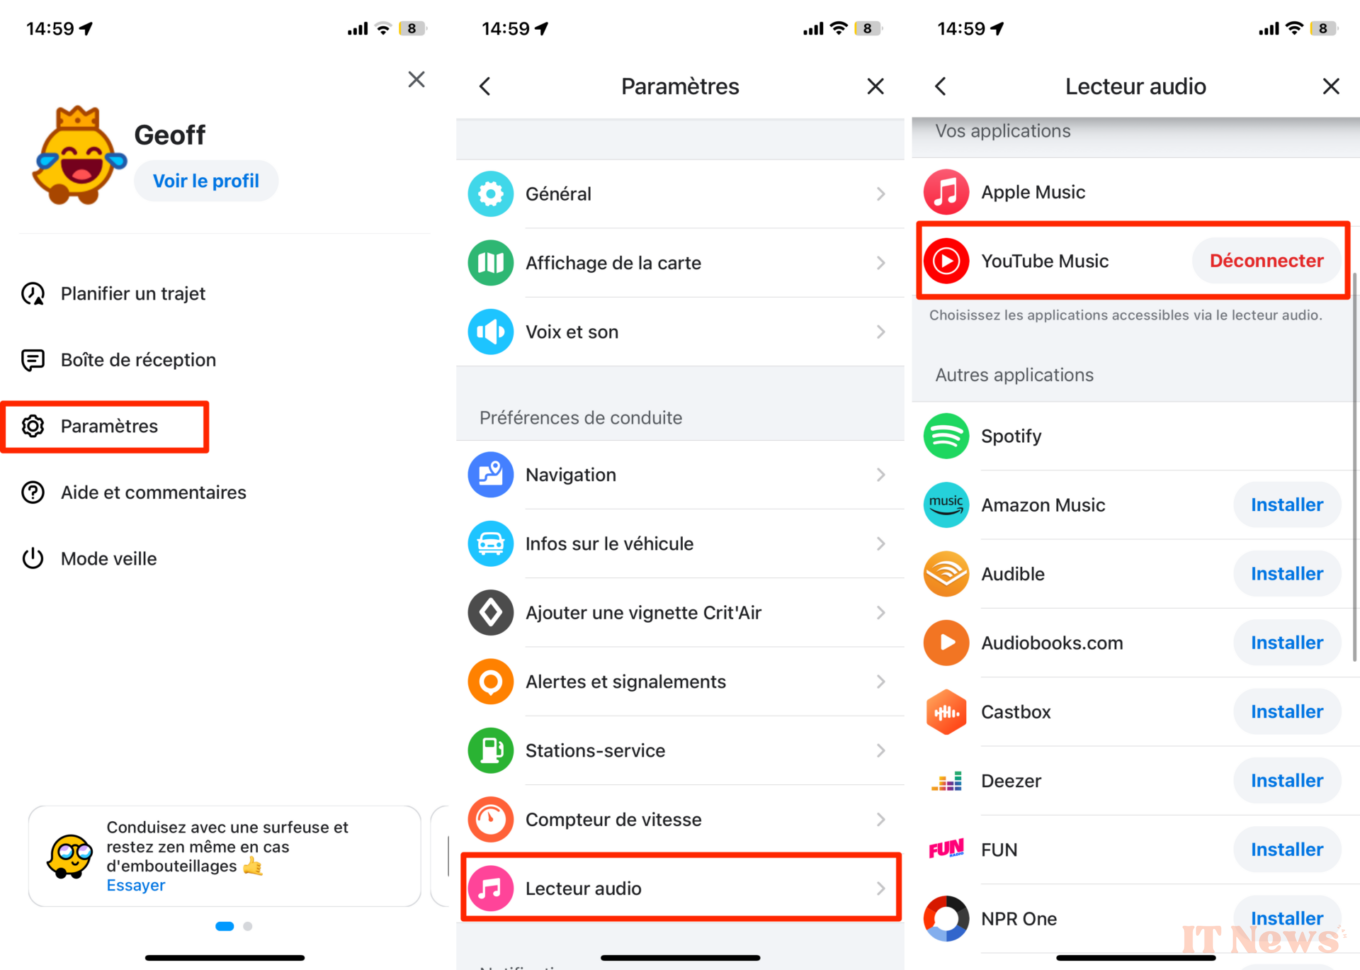
Then return to the browser window and tap the pink music icon located in the top right corner of the interface. Select your audio player. Waze should open your player, then return to the navigation page with an alert asking you to accept the connection with your music player.
Once the connection between Waze and the music player is established, you should see the buttons to control your music.
13. Let your loved ones know your arrival time
Did you leave without telling your loved ones? To avoid unnecessary worry, Waze offers a feature that lets you share your journey in real time.
To activate this feature, while navigating, open the lower panel and tap Share journey. You will then be offered several sharing options: Messages, WhatsApp, Email, or copy the link.
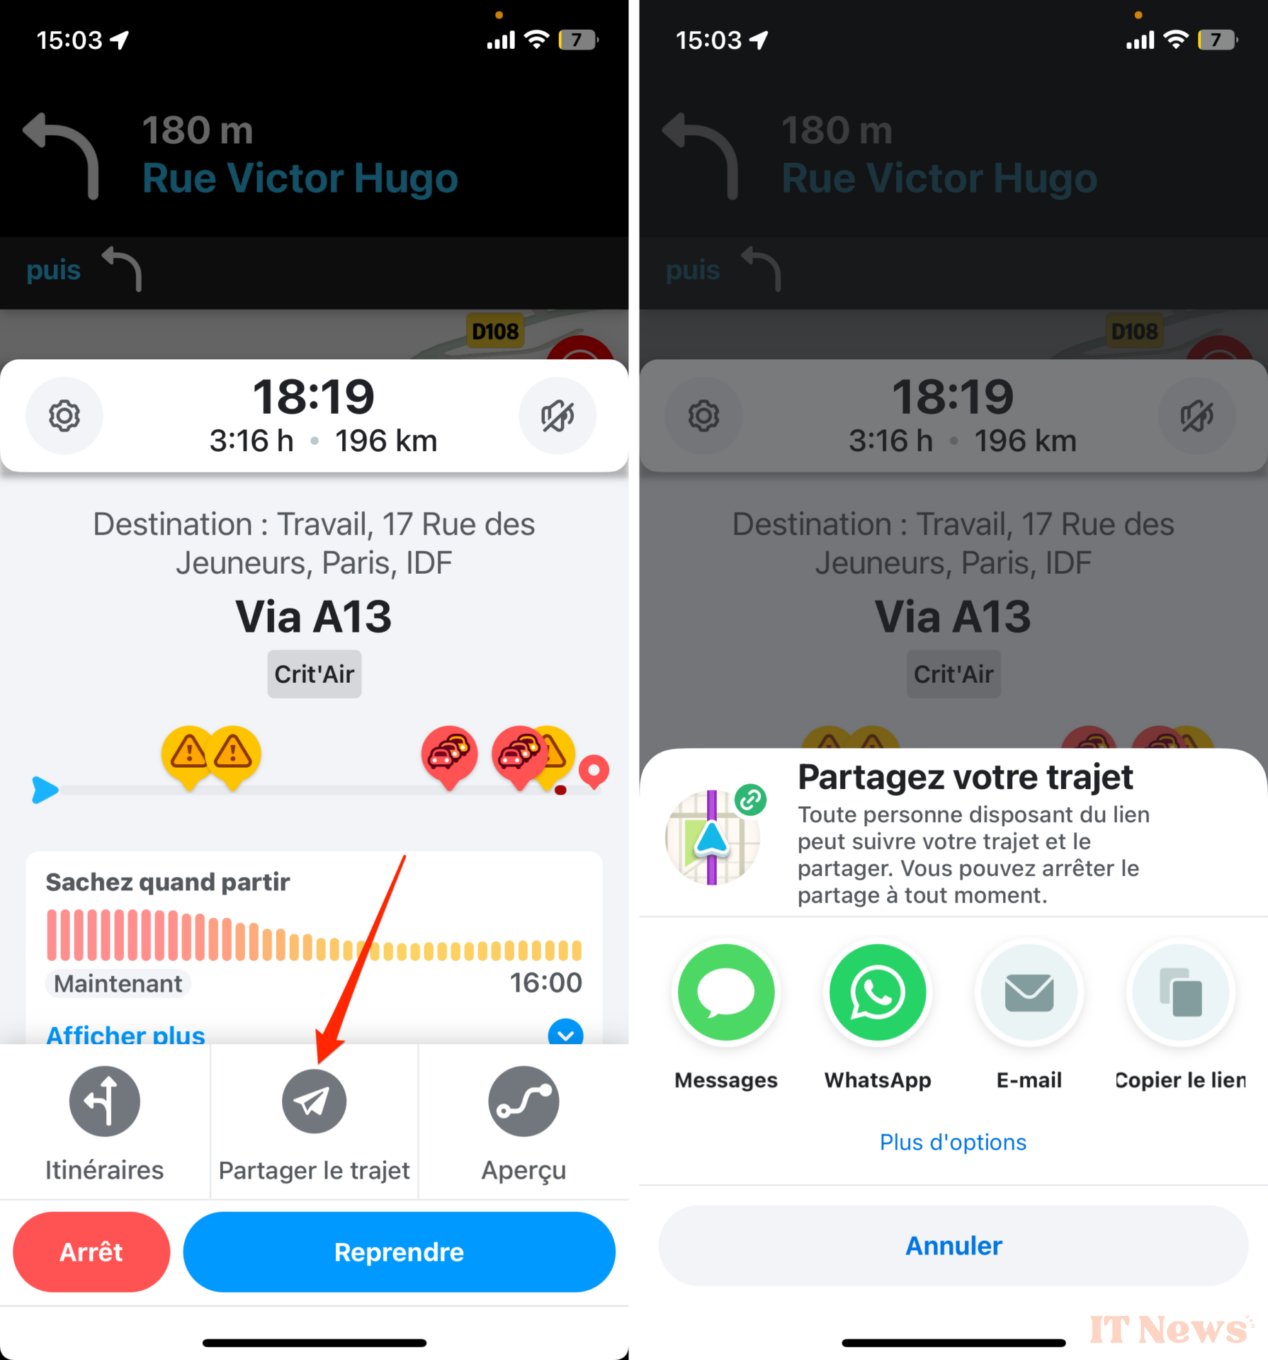
Everyone with whom you share your journey link will be able to follow you live on a map from any web browser.
14. Clean up the map
Too much information displayed simultaneously on the map can make it difficult to read. Therefore, it's best to do a little cleaning, especially since some elements may not be very useful on a daily basis.
Open Waze's Settings, then in the Map Display menu, go to Reports. Then disable any items you think you don't need.
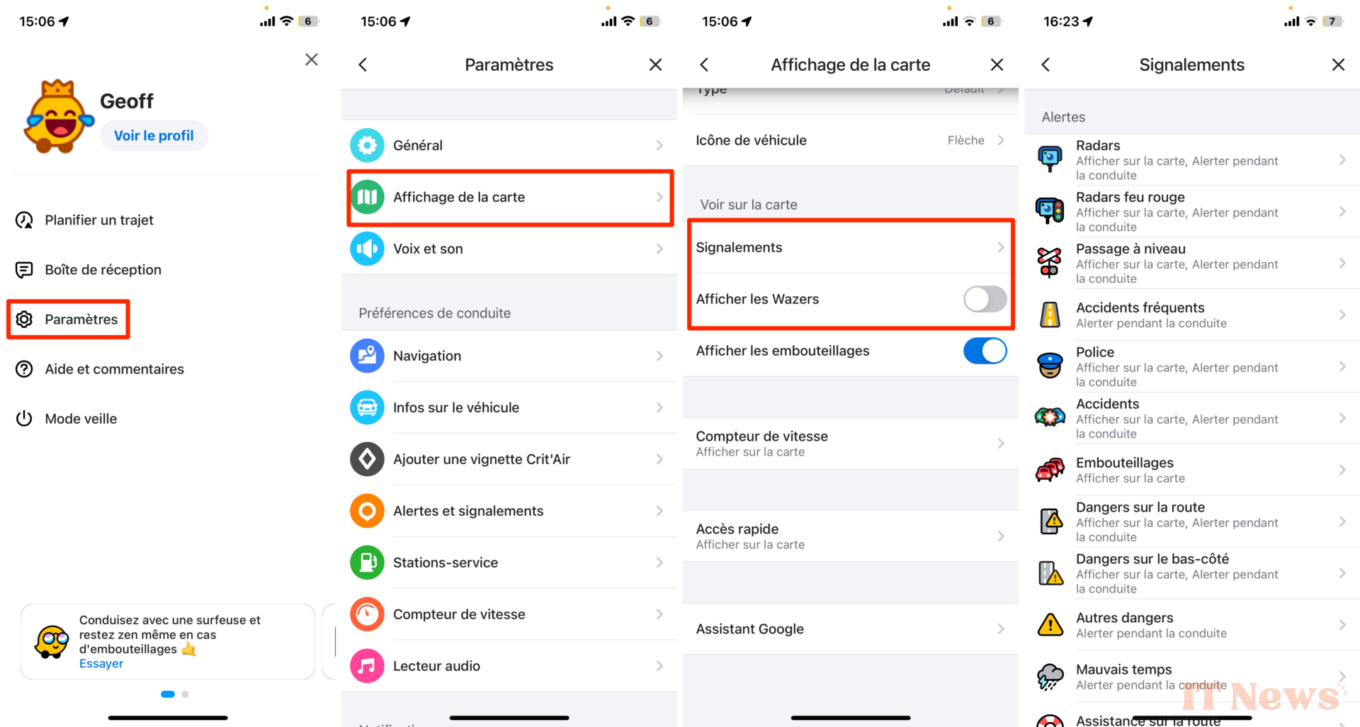
Then return to the previous menu and disable the Show Wazers option. Finally, go to Quick Access to disable things you don't need, like the compass or the zoom.
15. Access your trip history
You may not know this, but Waze has a menu entirely dedicated to your trip history. These are not recent journeys, but the history of all the journeys you have made with the application.
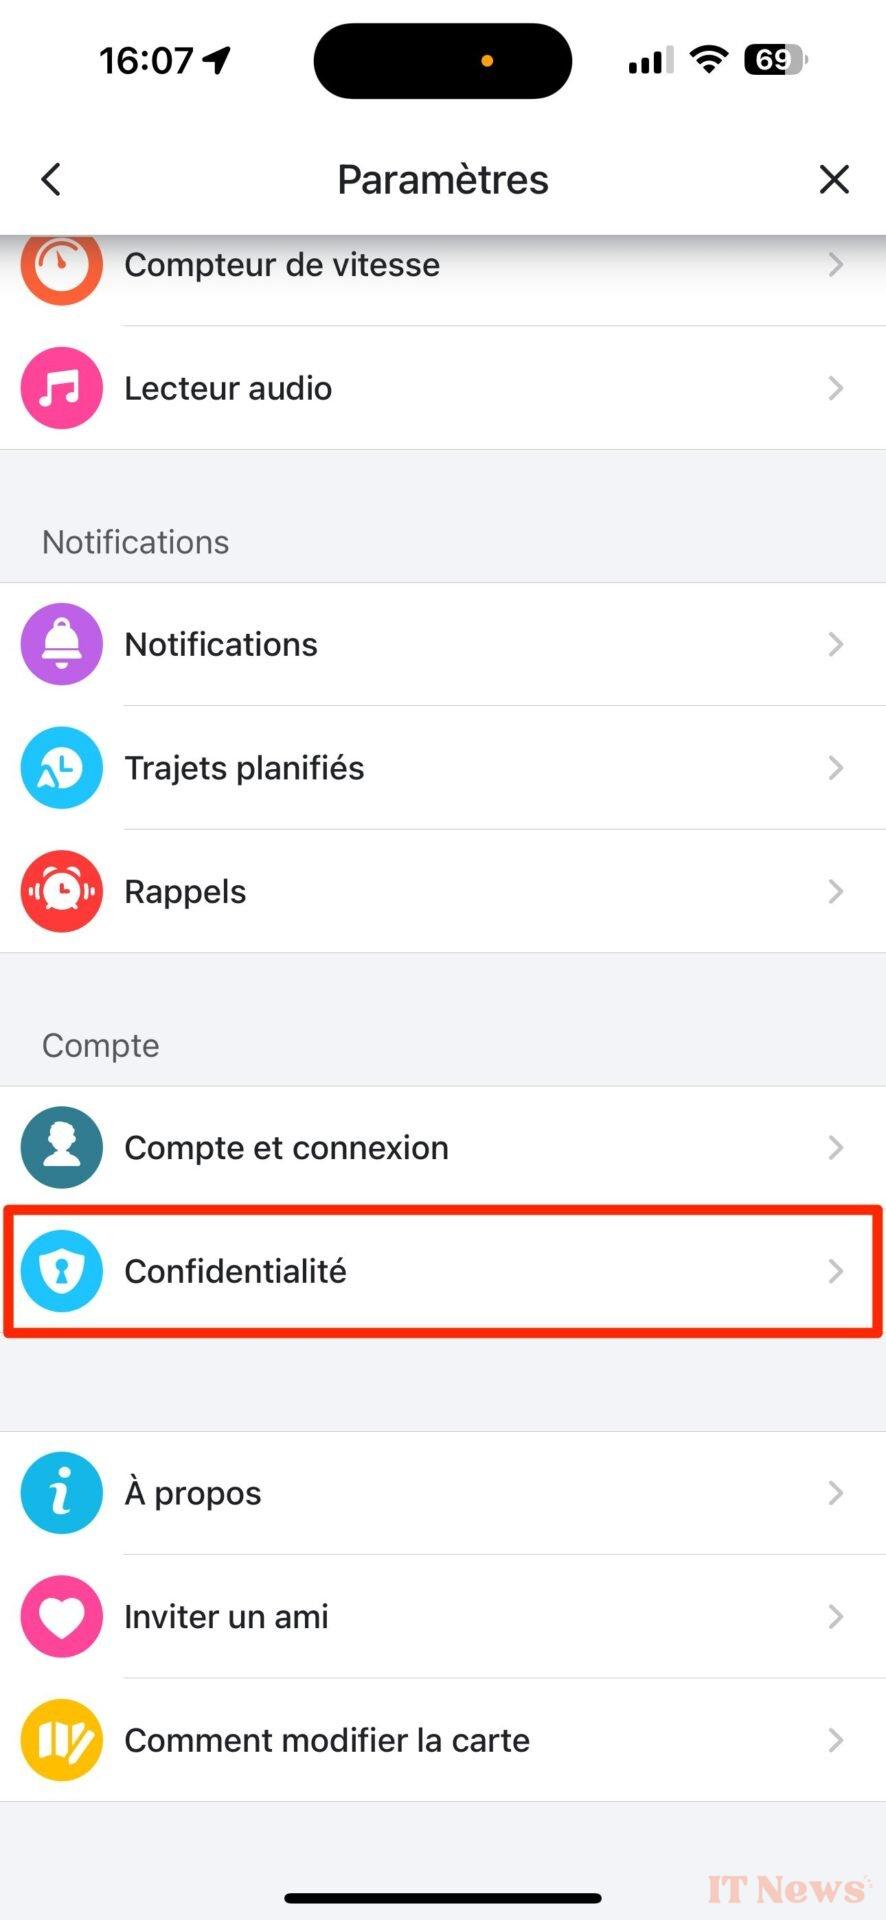
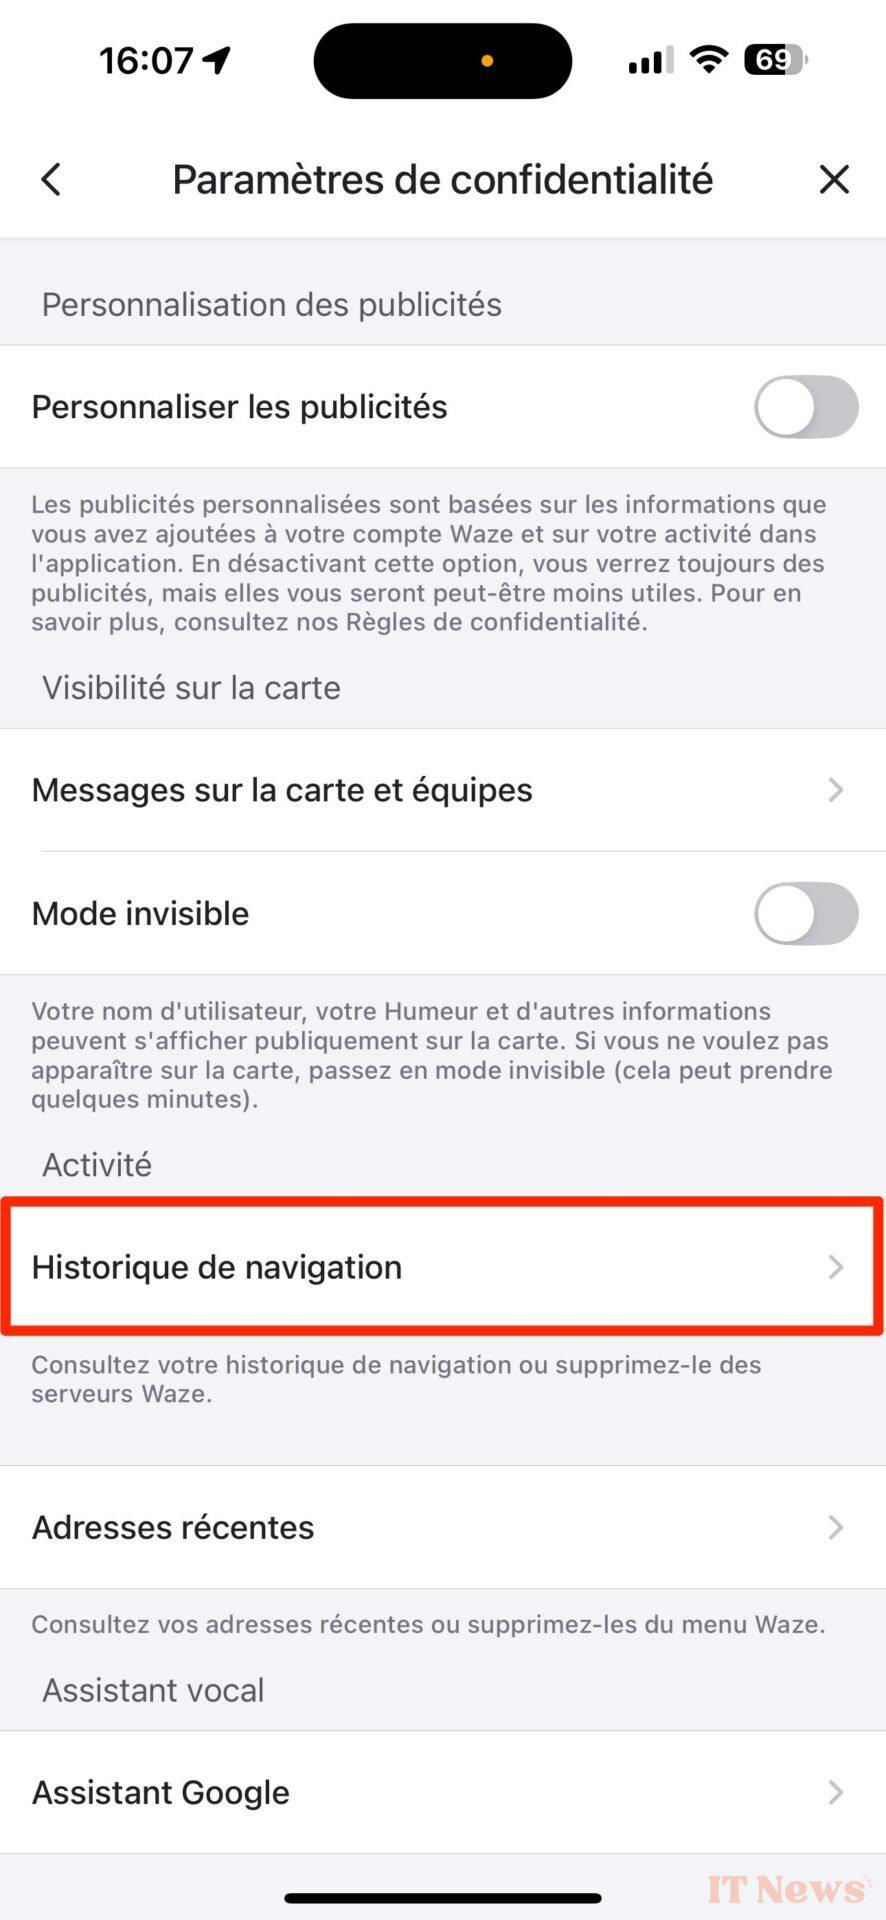
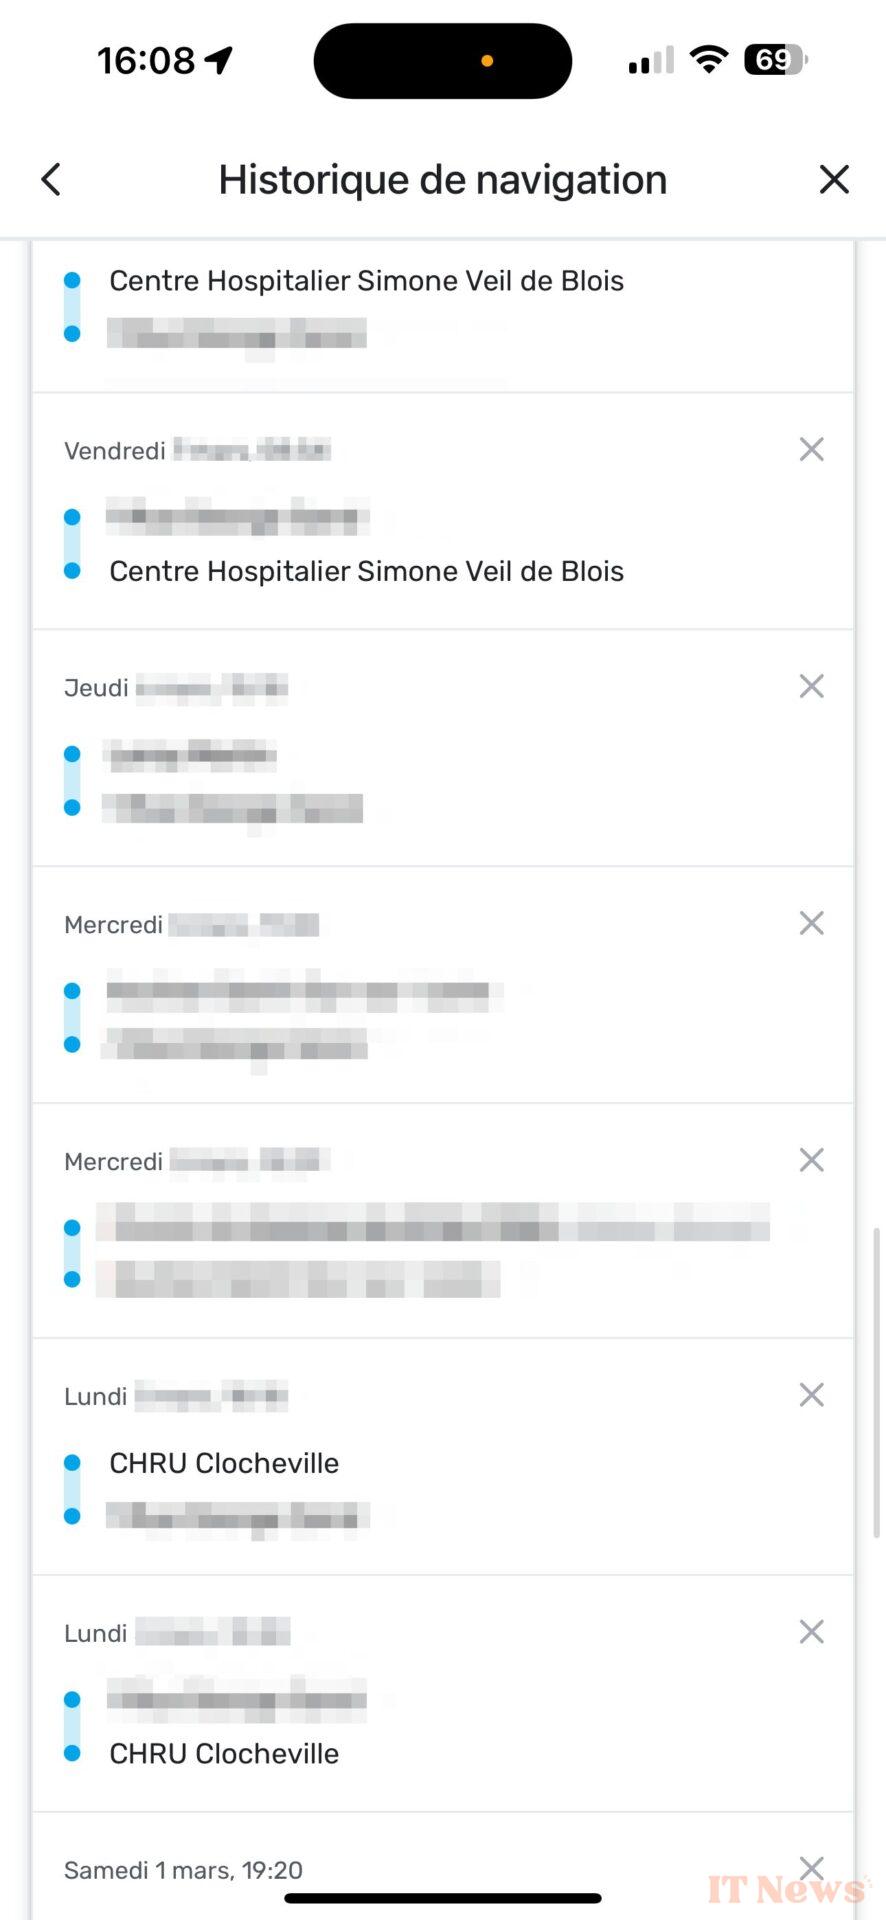
You can find it by going to Settings, then in the Privacy section, by selecting Browsing History. All searched routes will then be displayed in gray, while the routes you actually took will be displayed in blue.


0 Comments